ARMED FORCES
FEDERATED SUNS
AFFS
Field Manual 100-1
DECEMBER 3024
HOUSE DAVION TRAINING MANUAL
House Davion
Training
Manual
Version 1.0
Written by the
House Training Committee members
Compiled by
Honey Girl ~AFFS~
Committee chair: Honey Girl
Members: ERAngel (Chair, New Player
Section)
X-Men and SuperNova (Chairs, Lance Training
Section)
ADB, Aegis, Angmar, Bad Electric,
BaronNight, Bloodman, DeathStroke, Eagle, Frodo, HeadShot, Homer, Jumper,
Mouse, Necro, Renegade, Rezident Alien, RogueWarrior, Seeker, Skywalker, Spawn,
SuperNova, Teafour, I/ince, VictoryRoad, Wizzard, Wolfgang, and X-Men
Committee Advisors: Alclarin,
DeathWalker, Bear Frunze, and IceDemon
Special assistance and morale boosters:
KnightWing, Qin, Yarmoor, and G.D. Stone
Table
of Content
Introduction: How To Use This Training Manual................................. 6
BASIC INDIVIDUAL NEW PLAYER TRAINING........................................................ 7
Lesson 1: In Battle................................................................................................ 7
Battle Communications (F7, F8 and
(optional) Roger Wilco).... 7
Communicating with players in battle using text:.................................................... 7
Roger Wilco................................................................................................................. 7
Heads-Up Display (HUD)
description......................................................... 7
Main View Screen (MVS)............................................................................................ 8
Compass tape (Headiug Readout)............................................................................... 9
Facing direction.......................................................................................................... 9
Direction of travel (or heading).................................................................................. 9
Mech markers............................................................................................................... 9
Time remaining........................................................................................................... 9
Left side panel...................................................................................................... 9
Magnification.............................................................................................................. 9
Right side panel.................................................................................................... 9
Eject.............................................................................................................................. 9
Overhead tactical map (OTM).................................................................................. 10
Communications log................................................................................................. 10
Lower Information Panel............................................................................. 10
Critical systems lights............................................................................................... 10
Radar scope................................................................................................................ 10
Heat Gauge................................................................................................................ 11
Jump Jet Gauge......................................................................................................... 11
Basic Maneuvering and Driving:
forwards, backwards, turning, stop, torso
twisting.................................................................................................................... 11
Key pad (Number pad) keys:...................................................................................... 11
Keyboard Keys............................................................................................................ 12
Aiming.......................................................................................................................... 12
Damage Color Coding system................................................................................... 12
Weapons display................................................................................................. 13
Reading left to right, each weapon has the following:........................................... 13
Single firing weapons................................................................................................ 13
Targeting Interlock Circuits
(TICs )..................................................... 14
TICs, ok, I have them set, how do I fire them?........................................................ 15
Controls: Keyboard & Mouse:................................................................................... 15
Joysticks..................................................................................................................... 16
Lesson 2: In-Game Communications............................................................. 17
Finding other players and house
members..................................... 17
ComStar (Com*) Ids............................................................................................. 17
ComStar messages: receiving, replying, and sending.............................................. 17
Lesson 3: Moving through the Game World........................................ 18
Lesson 4: Ready Room Mechanics -- Buttons and Actions.......... 19
The display............................................................................................................. 19
Meaning of 'sides'............................................................................................... 19
Help button........................................................................................................... 19
! Button...................................................................................................................... 19
Lesson 5: The ‘Mechs.......................................................................................... 20
The ‘Mechs button............................................................................................. 20
Classes of mechs
(advantages/disadvantages)........................... 20
House Davion 3025 mechs (as of 12/19/99 )............................................................. 20
Mech Anatomy........................................................................................................... 21
How to select and drop into battle............................................................................ 21
Lesson 6: Advanced ‘Mech Driving and Targeting........................... 22
Legging and heading........................................................................................ 22
Torso
twisting and advanced views with sticky view key: Side views and page up/page
down........................................................................................................ 22
Side views................................................................................................................... 22
Sticky View................................................................................................................ 22
Weapons locations and weapons
stripping.................................... 23
Heat Management............................................................................................... 23
The Heat Indicator.................................................................................................... 23
TICs and heat management...................................................................................... 23
Mech weak spots................................................................................................ 24
Fading and using weapons ranges......................................................... 24
Lesson 7: Introduction to Basic Team Lance Concepts............. 26
· Assault Lance: This means take any ‘Mech you want in the game...................... 26
· Heavy Lance: This means take any Mech except an assault mech...................... 26
· Light Lance: This means take only lights............................................................. 26
· True Lance: Take one Mech of each class........................................................... 26
Basic Lance Command abbreviations....................................................... 27
Speed and Heading Commands................................................................... 27
Targeting Commands....................................................................................... 27
Formation Commands....................................................................................... 27
Maneuvering Commands................................................................................ 28
Lance Formation Graphics.......................................................................... 28
Tracking Progress, Advancement, and Testing............................... 29
Appendix I: What and Who is House Davion (Armed Forces of the Federated Suns, or AFFS)........................................................................................................................ 30
The Soldiers Code for House Davion................................................... 30
BattleTech Rules of Conduct
(BTROC)............................................... 31
Offenses...................................................................................................................... 31
Penalties..................................................................................................................... 34
BattleTech Assistants................................................................................................ 34
Policies and Disclaimers........................................................................................... 35
Chat/Event Logging.................................................................................................. 35
Game Mechanics........................................................................................................ 35
Transferring Characters............................................................................................ 35
Character Purges....................................................................................................... 36
House Davion Chain of Command
(CoC).................................................. 36
House Davion’s Place in the Inner
Sphere........................................ 37
Appendix II: History of the Inner Sphere from 2018 to 3025, and Time Line of Davion History......................................................................................................................... 39
Appendix IV: Keyboard Layout....................................................................... 43
Appendix V: ‘Mech Quick Reference - Multiplayer BattleTech Mech Quick Reference................................................................................................................. 44
Appendix VI: Weapons Quick Reference - MultiPlayer BattleTech Weapon Quick Reference................................................................................................................. 50
Appendix VII: ‘Mech Weak spots..................................................................... 51
Introduction: How To
Use This Training Manual
This manual is a series of lessons to
be used by the Trainers and Trainees of House Davion. The lessons are presented
in a logical order for training new players to MPBT: 3025. Since most new
players are interested in immediately dropping into battle, that lesson is
presented first. However, new players must learn to navigate in the game interface,
find and communicate with other Davion players (especially a trainer), find the
location of their own combat unit, and learn to select the proper ‘Mech.
The order of lessons does not have to
be strictly followed; a trainer can customize the training regimen according to
their needs and to the needs of the new player. But all lessons contained here
must be covered during the training process, and completion of the lessons must
be tracked by the unit for each player.
The Appendices at the back are summaries,
and serve a dual purpose.
·
They are supplements to the manual for use by trainers and
trainees
·
They will be included in the manual to be sent to new
players for use during their training. Thus, the trainer and the new player
both have the same information for review during the lessons.
BASIC
INDIVIDUAL NEW PLAYER TRAINING
Lesson
1: In Battle
Battle
Communications (F7, F8 and (optional) Roger Wilco)
I cover this function first because you
will need to communicate with the players in order to train, and to get
feedback from them.
Communicating with players in battle using text:
F8: To talk to
all players in the drop, hit the “F8” key, then type in what you want to say,
then hit the “Enter” key.
F7:
To
talk to players on your team (same color setting in the ready room) hit the
“F7” key, type in what you want to say, and hit the “Enter” key.
If you discover you cannot maneuver in battle, you probably have not pressed the “Enter” key to display your message.
Roger Wilco
RW is a communications software program
that is available for downloading at www.rogerwilco.com. We use it often for voice communications in
and out of MPBT. Being able to talk to your trainee with your voice has
definite advantages. Plus, the new
player will probably be using Roger Wilco later on in lance battles.
Heads-Up
Display (HUD) description
First, take the time to review the HUD
with the new player.
The HUD has four sections:
·
the large main view screen (MVS), located in the top-center
·
2 side panels, located along the left and right sides of the
MVS
·
information panel along the bottom half of the screen below
the MVS and side panels
Nearly everything you need to know
during combat is present or can be opened on the cockpit screen at all times.
At a glance, you can see all of the important data for your own ‘Mech and your
opponents’ ‘Mechs necessary to help you win a battle.

Main View Screen (MVS)
Your point of view is through the
window of the cockpit as you’re sitting inside the ‘Mech, and contains a large
amount of information. Target
information is available only for the currently selected target. Press the
“Enter” key to target a single ‘Mech that is in view. A single rectangular box
indicates an enemy ‘Mech; a double box is a friendly ‘Mech, or teammate, that
you should not fire upon. Only one ‘Mech can be targeted at a time. If more
than one ‘Mech is in view on the field, pressing “Enter” cycles between the
targets. Any targeted ‘Mech is automatically displayed in the target display in
the lower right of your screen. Pressing “Y” clears this information from the
middle of the screen. Targets can also
be selected by clicking on the ‘Mech with the mouse in select mode in the
overhead view.
Your weapons will automatically tell you
when they are in range by a purple letter to the left of a specific weapon on
the weapon status panel. This panel is located to the left of your radar
screen. L indicates long range, M indicates medium range, and S indicates short range.
Targeted ‘Mech information is displayed
by pressing the <T> key.
Weapon locations are listed individually on the right side of the HUD. Damage
is color-coded as gray, green, yellow, red, and black (from moderate to
severe). Any destroyed system is displayed in black. Your ‘Mech information is displayed by pressing the <U> key
Compass tape (Headiug Readout)
The compass at the top of the battle
view screen is broken into 10 degree increments, 0 degrees is due north. The compass tape across the
top of the HUD has upper and lower direction indicators, which convey two
pieces of information
Facing direction
Along the top of the
tape is the direction the torso is facing; this facing will change if the torso
is twisted.
Direction of travel (or heading)
The lower direction indicators mark the
direction of travel of your ‘Mech; this facing will change when you turn your
‘Mech.
Have the new player twist and turn
(suing 4 and 6 on the number pad) so they can see the effects on the compass
tape.
Mech markers
Are small color-coded arrows that move
across the top of the screen above the compass tape. These indicators represent
hostile and friendly targets in the line of sight. Indicators for off-screen
targets appear on the top left or right side of the MVS in the direction that
will most directly bring the target into view.
Time remaining
In a mission is indicated in the upper
left corner. Normally, this counter begins at 15 minutes 0 seconds.
Left side
panel
Magnification
The main view screen is capable of
three levels of magnification (zoom): normal (1x), medium (5x), and high (10x).
Crosshairs are present only in the normal level of magnification.
To zoom in
press the “>” key.
To zoom out
press the “<” key.
The <?> key returns magnification to
normal.
Zooming in
decreases the accuracy of your weapons.
Right
side panel
Eject
Eject from battle by clicking the eject button twice, or pressing the
”Escape” key twice.
Overhead tactical map (OTM)
OTM
is opened by clicking on the command
button or by pressing the < =
> key. Your own ‘Mech will show
as a blinking bracket on the map. Only ’Mechs in the line of sight (not hidden
by terrain)will show on the tactical overhead view. Clicking on a ‘Mech bracket
targets that ‘Mech.
Communications log
These logs lists the messages sent and
received during combat. Clicking on the “log”
button or pressing the “-“ on
the main keyboard opens and closes the log, which can be scrolled. Team
messages (transmitted using F7) appear with an asterisk (*) before the message.
General transmissions sent using F8 are not preceded by an asterisk, and are
seen by everyone.
Lower
Information Panel
Critical systems lights
·
S – Sensors are located in
the head of every ‘Mech. They are the interface between you and the outside
world.
·
E - Engine is located in the center torso
of every BattleMech. The chamber contains the cooling system (heat sinks) for
the engine. Damage is color-coded: yellow is light damage; red is severe.
·
G - Gyro is located in
the center torso of every BattleMech, near the torso. It represents a huge
gyroscope and the related systems that help to stabilize a BattleMech. Like the
engine, the gyro is surrounded by armor designed to prevent serious damage
directly to the mechanism; however, the gyro is too delicate to survive
anything more than minimal damage. When the gyro has been destroyed, the 'Mech
becomes immobile and falls easily. If
the 'Mech remains standing, its body locks in place to prevent any unbalancing
motion.
·
L - Life support system is located in the
head of every BattleMech. If the head is destroyed, your ‘Mech is destroyed.
Radar scope
The
radar screen is located in the center of your monitor, directly below your
battle view screen. You will notice upon dropping that your radar is set at the
maximum range (2500 meters). The outer orange band on this screen represents
800 meters. Once an opposing Mech gets close to this outer band you should zoom
your radar to the 800-meter scale. This is accomplished by hitting the “Delete”
key 1 time. Try to get them used to putting the radar setting at 800m once in
battle. This seems to work best for most players.
Radar ranges are 2500, 800, 300, 100
and 50 meters respectively. Tell them to scroll through all ranges use the
“insert” and “delete” keys. You can also scroll through the ranges in one
direction by hitting the teardrop shaped button above and to the left or your
radar screen.
Heat Gauge
The
heat indicator is located
directly to the left of your radar screen, and is a vertical bar graph that is
not lit until your Mech starts building up heat from weapons use, jumpjets, and
engine heat. Minor heat is shown in green, major heat is shown as yellow. If
you overheat, your ‘Mech will shut down. There is no override button for ‘Mech
shutdown.
Have the new player fire several
weapons at once, or a fast single-firing, and tell them to observe what happens
on the heat gauge.
Jump Jet Gauge
The Jump jets gauge is located directly
to the right of your radar screen, and is a vertical bar graph. If your mech is
equipped with jumpjets, the green bar fill shows that you have fuel. If your mech cannot jump, the bar is dark
gray. Have the newbie press the “Home”
button. They will see that the fuel level drops, and the color slowly changes
to yellow, then red when jet power is depleted. It will slowly recharge after a
jump.
Basic
Maneuvering and Driving: forwards, backwards, turning, stop, torso twisting
The following keys are for standard
keyboard movement during game play, but some of these controls can be
configured to your joystick, if you use one. Joystick configuration will be
covered in the next section. All these keys and their functions can be found in
the “drop” or battle mode by hitting the “F1”
key and holding it down, which opens the “Key Map”.
Key pad (Number pad) keys:
·
Forward speed: Using the “8” key on your numeric keypad, adjust
speed by repeatedly pressing this key till the desired forward speed is
achieved. Your forward and backward speed is indicated just above radar screen.
The “8” key also will slow your
reverse speed.
·
To slow your ‘Mech, the “2” key on the numeric keypad is used
like the forward key. Repeatedly press the “2”
key to slow your ‘Mech to the desired speed. The “2” key is also used to go into and to adjust reverse speed. To increase reverse speed, stroke the “2” key until desired reverse speed is
achieved.
·
Stopping: The “5”
key on the numeric pad is your “all stop” button.
·
Turning your
Mech: Turning your
‘Mech is achieved by using the “4”
and “6” keys on the Numeric keypad.
Use “4” to turn left and “6” to turn right.
Keyboard Keys
·
Torso
Twisting:
is achieved by using the “A” and “D” keys, the “A” key being Twist Torso left, and the “D” key being Twist Torso Right.. Note that torso twisting is NOT
the same as turning your ‘Mech!
·
Recenter
Torso:
To re-center your torso hit the “M” key.
·
Getting Up: There are times when you will be
knocked over, either due to a collision or having a leg blown off your ‘Mech.
When this happens, use the “F12” key
to get up. Hitting the stop key (“5”
on the number pad) prior to getting up will shorten the time it takes to get
your ‘Mech to the fully upright position.
·
Jumping: Mechs that are equipped with jumpjets can
jump in the air to achieve faster forward speeds, hurdle obstacles, get into a
superior firing position, or just make your Mech harder to hit. If your Mech
has jets, the jump key is the “Home”
key. Once your Mech is in the air, you can use the “Boost” keys, (“2” and “8” on the numeric keypad) “2” being vertical boost, and “8” being forward boost. Watch the
jumpjets gauge as you jump.
·
Turning your
Mech in a jump: Turning in the air is achieved the same way as on the
ground, by using the “4” and “6” keys on the Numeric keypad. Use “4” to turn left and “6” to turn right. You can turn in a jump as long as your
jumpjet indicator shows you have fuel.
Aiming
To
target a ‘Mech, hit the “Enter” key,
and a single green box will appear around the targeted enemy ‘Mech. (A double box indicates a teammate.) You may
aim using the basic maneuvering keys described above, with a properly
configured joystick, or with the mouse.
To
enable Mouse targeting, hit the “Backspace” key once you have left the drop
ship.
To
aim using the mouse, press the “Backspace” button until ‘Targeting mode’
appears in your HUD in the lower right. Moving your mouse will move your ‘Mech.
Your mouse will then control your sight’s elevation and side to side movement.
Place the crosshairs on your screen on the targeted ‘Mech. Single fire your
weapons using the spacebar or the left mouse button if you are using a mouse
for targeting
Damage Color Coding system
If
you let the new player take some shots at you, this will help you explain the
color-coded damage.
Color
codes
GRAY undamaged location
GREEN armor damage
only
YELLOW internal
structure damage or no armor remains
RED internal
damage, location close to being destroyed
BLACK location destroyed
Weapons
Display
The vertical weapons display in the
lower left is for configuring targeting interlock circuits (TIC) and monitoring
the status of a weapon’s availability and ammunition stores. Each weapon from
top to bottom is associated with a number (1 through 0) along the top of your
keyboard. You can select a weapon for firing by clicking on it or by pressing
the weapon’s number. When selected, the black part of the name box turns gray.
The space bar can then be used to fire the weapon.
Reading Left to Right, Each Weapon has the
Following:
Range
indicator: Lights up when
the weapon is in range. Each weapon is part of one of three range classes
(short, medium, or long. A letter corresponding to that range class lights up
when it is in range. At the outside ranges of a weapon’s effectiveness, the
light is red. When the target is deeper in the weapon’s effectiveness range,
the light is yellow; and finally, the light is green when the weapon is very
close to your BattleMech. If a weapon
has a minimum range, the light turns blue when the target is within minimum
range.
Weapon
Name: Indicates the
name of each weapon that the battlemech uses.
Ammunition
counter: Indicates the
number of rounds. When there is a dash in the weapon’s ammo counter, the ammo
is depleted, and the weapon can no longer fire.
Readiness
boxes: Each TIC for
each weapon has a green readiness light. The green LED in the center of the box
is lit when a weapon is ready to be fired.
Single firing weapons
Is accomplished by hitting the space
bar, or using the left mouse button if you are using a mouse for targeting.
Targeting
Interlock Circuits (TICs )
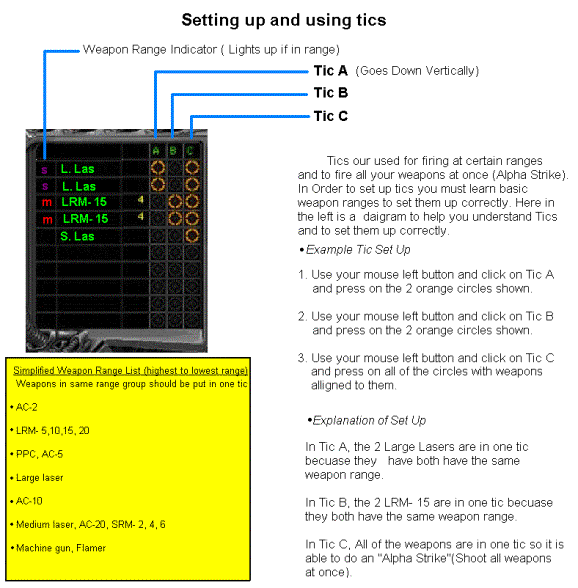
TICs
are
a means of grouping your weapons together (usually by range, sometimes for heat
management) so they fire under a single key. There are 3 “TICs”, they are “A”, “B”, and “C”, and are
labeled along the top of the weapons display
When a weapon
is on a TIC, the yellow circular LED is turned on; when that TIC is selected,
the black portion of the letter box is gray. You can configure weapons on any
or all of the three TICs in any combination.
How to set TICs is something you will
learn over time with experience. Most players set TICs by weapons ranges (See
the Appendix VI: Weapons Quick Reference). Experienced players will often set
them not only by range, but also for heat management.
On
the weapons status panel, you will see all your weapons listed by range and
type, usually (but not always) starting with the longest range first. You will
also notice there are 3 columns above them, marked A, B, and C. In each of the three columns for each
weapon, you will see a green circle if that weapon will fire in the view your
Mech is in at this time (more on side and rear views later).
To place a
weapon in a particular “TIC”, click with your mouse on the circle in the
readiness box for that weapon under the A, B, or C. You can also use the
keyboard keys: select the weapon by by it’s assigned number (which you do NOT see
in the weapons display), then pressing “L” for TIC A, a semicolon “;” for TIC
B, or an apostrophe “ ’ “ for TIC C.
An orange circle now is around that
weapon under the letter for the corresponding “TIC”, repeat this process until
all your TICs are set. Also keeping in mind that the more weapons you fire at
one time, the more heat you will generate (see Heat management).
For instance, if you have a ‘Mech with
two PPC’S, one LRM 15 , and 2 Medium Lasers, you would want to put the LRM 15
under TIC A by itself since it will be the first weapon to “Range” the targeted
mech. Then the 2 PPC’S would be put under TIC B, and lastly the 2 Medium Lasers
would be under TIC C.
TICs, ok, I have them set, how do I fire them?
TICs are fired using the keyboard keys
across the top of the number pad. TIC A is fired by hitting the “Num loc” key, TIC B is fired by
hitting the “/” key, TIC C is fired
by hitting the “*” key. Your
joystick and mouse can also be configured in control panel to fire TICs.
To single-fire the weapons on a TIC,
just click on the TIC letter (A, B, or C) and press either space bar or the
button you have configured for single firing on your joystick.
Controls: Keyboard & Mouse:
Controls allow you to maneuvering your
Mech, aim and fire your weapons, select targets and radar ranges, communicate
with others in the game (either team or open – see above), check temperature or
previous communications, etc.. We’ve reviewed the controls necessary to operate
your ‘Mech and fire your weapons as we’ve gone through the topics above. For a
summary of the keyboard controls, see Appendix IV: Keyboard Layout. The keys
listed there are for standard keyboard game play, but some of these controls
can be configured to your joystick, if you use one. Joystick configuration will
be covered in the next section.
Joysticks
Since there are many types of joystick
available, this is one example of possible configurations using one of the more
common sticks used in MPBT, the
“Sidewinder Precision Pro”. However, some of these control suggestions
could be transferred to other sticks.
*These are suggestions
only, as you gain experience you may find better uses for your joystick buttons
than those suggested here.
These settings will be moved to the
next page, so all settings information will be printed on one page for ease of
use in game. In ready room, click on
the box directly below the help tab to the left of your screen that looks like
it has a couple slide switches on it. Click on the control tab, in there you
will see the following controls:
Torso
twist: Rudder Stick Deadband: 3rd or
4th click from left
Torso
Tilt: Stick “Y” Rudder Deadband: same as
stick Deadband
Turn
Mech: Stick “X” (all sticks are different, experimentation
required)
Throttle: “Z”
Next, click on the tab to the right
marked “Button Mapping” Highlight button 1, and then in the column of functions
select the function you want to assign to each button. After each button is changed to what you
want it to control, make sure you hit the assign tab to the right before moving
to the next button.
Button
1 Fire
current weapon
Button
2 Fire
Tic “A”
Button
3 Fire
Tic “B”
Button
4 Fire
Tic “C”
Button
5 Target
detail Readout
Button
6 Radar
Zoom in
Button
7 Radar
Zoom out
Button
8 Select
Target
Button
9
Button
10 Reverse
Hat
Switch Forward: Initiate Jump
Hat
Switch Backward: Center Torso
Hat
Switch Left: Get Up
Hat
Switch Right: Mech damage Quick View
Be sure to hit the “OK” button after
you are finished with your selections.
Lesson 2:
In-Game Communications
Finding
other players and house members
[JLR1]
NOTE: This will be written specifically
for MPBT: 3025®
ComStar
(Com*) Ids
When you create a game account and log
into MPBT: 3025®, you are
automatically assigned a 5-letter ComStar ID made of consonant letters, which
uniquely identifies you in the game.
Examples of Com* IDs are: RTHVB, MZLTH,
and PWSTQ
ComStar messages: receiving, replying, and sending
NOTE: This will be written specifically
for MPBT: 3025®
Lesson
3: Moving through the Game World
NOTE: This will be written specifically
for MPBT: 3025®
Lesson
4: Ready Room Mechanics -- Buttons and
Actions
The display
NOTE: This will be written specifically
for MPBT: 3025®
Meaning
of 'sides'
Sides, or teams, are set up in the
ready room before you drop into battle. While in the Ready Room (where you are
before you drop) click the STATUS button. This will show what color (there are
a total of 8 colors) everyone in the room is. If you want to switch colors,
then click the SIDES button, and make your selection.
In a Free-For-All (FFA) drop, everyone
in the room is a different color, and it’s every ‘Mech for himself.
A team is a group of players who drop
on the same color. If you are the same color as another player, they will have
a double rectangle box around them when they are targeted. Don’t shoot them. Firing on a teamate is
"backstabbing", which is against the BTROC (BattleTech Rules Of
Conduct). Also, if you’d like to, when you click the STATUS button, if you’d
like to see anyone’s (including your own) statistics, use your mouse pointer to
highlight and double click that person. You’ll see their sanctioned duel
record, how many total battles they’ve had (sanctioned and practice) and their
rank against the other fighters on Solaris.
Help
button
The Help
button opens a Windows dialog which you can use. Closing this dialog returns
you to the game. The F1 key does the same thing as the Help button.
! Button
The red ! button is for reporting violations of the BTROC to the game staff
of Kesmai Corp. Clicking on the ! button causes all conversation you have seen,
including your own, to be logged in a special file for review by Kesmai Corp.
staff.
Lesson
5: The ‘Mechs
The
‘Mechs button
Clicking on the ‘Mechs button will
bring up a selection panel of all the ‘Mechs you are currently able to drive.
This applies to both Solaris and to MPBT
3025®.
Classes
of mechs (advantages/disadvantages)
There are 4 classes of ‘Mechs: Light,
Medium, Heavy, and Assault. The light ‘Mechs are fast, harder to hit, but have
weaker weapons and armor than the other classes. The bigger and slower heavy
and assault ‘Mechs are more heavily armored with stronger weapons. But the
bigger the size, the less the maneuverability, but the more armor and better
weapons a ‘Mech will have.
Within each of the four ‘Mech classes,
some ‘Mechs are better than others. Your selection of ‘Mechs will depend on
your ranking points and your House Standing in 3025. As your ranking points and
House Standing increase, so will your selection of ‘Mechs for battle. Overall,
the more skill you have as a player, the better your ‘Mech selection for combat
missions will be.
House Davion 3025 mechs (as of
12/19/99 )
Green house standing: Lights
Regular house standing: Mediums
Lights:
Stinger 3r
Spider 5v
Flea 4
Flea 15
Locust 1v
Wasp 1d
Mediums:
Clint 4T
Vulcan 5T
Vulcan 2T
Blackjack 1DC
Centurion 9A
Centurion 9AH
Centurion 9AL
Enforcer 4R
Shadowhawk 2D
Mech Anatomy
Battlemech are
broke down into Eight target areas.
These areas contain differing amounts of armor, and will hold the
various weapons the Battlemech is armed with.
Unique of these areas are the Torso areas. The Torso areas due to their large size have front and rear
armor. The rear armor of the Torso is
inherently a weak point on all battlemechs.
The target areas and the abbreviations that will be used in combat are
listed below:
Head (H)
Left
Arm (LA)
Right
Arm (RA)
Left
Torso (LT)
Right
Torso (RT)
Left
Torso (LT)
Center
Torso (CT)
Left
Leg (LL)
Right
Leg (RL)
How to select and drop into battle
NOTE: This will be written specifically
for MPBT: 3025®
Lesson 6:
Advanced ‘Mech Driving and Targeting
Legging
and heading
Legging (shooting the legs off a
‘Mech) and heading (shooting the head) are legitimate tactics in this game.
However, as you will soon see, a downed ‘Mech can still aim and fire using
different ‘views’. Just because a ‘Mech is down, does not mean it is ‘out’.
Torso twisting and advanced views with sticky view key: Side
views and page up/page down
Side views
You can view right, left, or behind
your ‘Mech by using the cursor arrow keys. You can also fire certain weapons in
these directions, while holding these keys and firing you weapon that is
highlighted green during the view being selected. This is made much easier with
the use of “Sticky View”.
Sticky View
Allows you to use the side views to
look, and fire your weapons without holding the directional keys, “Sticky” View
is activated by pressing the “End”
key once. When “Sticky View” is set, the words “Sticky view mode” will appear
in the lower right corner of the battle view screen.
Yes I put
these two lessons together, as it is probably the easiest way to do it, however
it does limit your mech choices. This is probably the most important lesson we teach,
and as such takes a lot of time to do it right. The skill of twisting is tough
to learn but once mastered will help you survive much longer in the game. Start
this lesson in the middle of the arena without shooting. Twist for the cadet
and show him the difference between twisting and turning. Then observe him as
he twists. After he does it properly, move back out of range and start the
lesson.
Choose the
mechs carefully for this lesson. A suggestion is the Crusader 4d. This is a
mech in which you either twist or you die. It also fires well from each side
allowing you to combine the advanced views.
Watch the cadet closely during battles, make sure that he twists and
shoots from the side views as well. You may need to explain sticky view and its
purpose if the cadet is unaware of it. Also watch the cadet for over twisting,
or exposing his backside. Teach him to use the side view and its crosshairs to
prevent over twist. At some point in the lesson there is a good chance that you
will have hit his gyro, when this happens stop the lesson and explain the page
up and page down buttons, the views they give, and how to shoot when gyroed.
Take time with this lesson and give it the proper perspective. Make sure the
cadet is aware of and can do all aspects of twisting and advanced views.
Weapons
locations and weapons stripping
Remind the new
player that the locations of a targeted ‘Mech’s weapons can be seen by pressing
the “T” key.
This is a lesson that can be a lot of
fun. The purpose of this one is target practice. The object is to have the
recruit shoot first the arms, then the torsos, and last the kill. Don’t let
them cheat the lesson by hitting the torso and taking the arm as well. No TICS
are allowed in this lesson. Work this one several times until you are confident
the recruit can shoot well enough to take each piece as he is supposed to. This
is best done with the trainer and the cadet in the same mech. The mechs I use are as follows:
1.) Whitworth 1s -
I like this mech for this game because the weapons are all medium ranges and
each one is located in the piece they are trying to remove.
2.) Spider 5v -
The most common mech used for this. Its weapons are smaller but located in the
CT so they aren't lost as you fight.
The end of this is up to the instructor
as to when he feels the cadet has sufficient aim, however I usually tell the
cadet he has to kill me to pass. This isn't true but does put an element of
challenge into it and an amount of excitement for the cadet if he manages to do
it.
Heat
Management
Each Mech has a limited number of “Heat
sinks” for the engine and weapons heat. The number of heat sinks on each ’Mech
is in Appendix V: Mech Quick Reference. This information can also be found in
the “ready room” when you select your ‘Mech. If the damage to you’re ‘Mech is
severe enough, the engine will automatically shut down. While your ‘Mech is in
shutdown, you cannot move or fire weapons.
The Heat Indicator
Located directly to the left of your
Radar screen, and is a vertical bar graph that is not lit until your Mech
starts building up heat from weapons use and engine heat. Minor heat is shown
in green, as heat builds to higher levels, this graph increases and turns to
yellow. As heat builds to a critical level the graph turns red and fills past
the shutdown point “as indicated by a line ¾ of the way up the graph. At this
point your Mech will shutdown and you will hear an annoying warning buzzer
until such time as your heat level drops below the shutdown point.
Single-firing the weapons that generate
the most heat (the PPCs and lasers) will help control heat generation in
battle. There is no override for ‘Mech
shutdown.
TICs and heat management
Many players group their weapons on
TICs not just by range, but also for heat management. Lasers and PPC’s generate
a lot of heat. For example, a medium or long laser will often be put on a TIC
with an LRM, even though when firing the LRM, the laser may not be in range.
The purpose of this is to limit the number of lasers, and the heat generated by
them, being fired on the medium laser TIC.
Mech weak
spots
Each ‘Mech has certain weak spots which
can be used to your advantage in battle. Armor is not evenly distributed over
the ‘Mech. The back of all mechs is weak. Armor in generally concentrated over
the center torso to protect the engine.
Appendix VII is a summary of the
various ‘Mech weak spots.
Fading
and using weapons ranges
Fading is a
must have survival skill. At times, backing up is a much better tactic than
charging and dying. If you are in a ‘Mech with long range weapons are are
against a short-range ‘Mech, fading will be to your advantage as you are able
to fire your weapons at the target, but they are not yet in range to fire at
you.
Reverse speeds
in all mechs are roughly 2/3 of the forward speed.
Start fading
before your weapons come into range, at about 800 meters. Use your radar to
verify this. Take your time with this lesson and use at least two different
sets of mechs preferably three. At the end of the lesson if the cadet is doing
well and picking up as he should start to point out the times when he should
start to charge.
The following
are the mech match-ups that I like to use in the order I use them. The trainer
is in the charging mech while the cadet is in the fader.
1.) Catapult C1
vs. Annihilator - easy and slow to start
2.) Blackjack 1
vs. Hunchback 4p - a little tougher but an easy target plus the cadet really
pays for
a mistake (a good illustrator)
3.) Black jack 1
vs. Wolverine - a very common battle field combination
Weapons
Stripping
This is a
lesson that can be a lot of fun. The purpose of this one is target practice.
The object is to have the recruit shoot first the arms, then the torsos, and
last the kill. Don’t let them cheat the lesson by hitting the torso and taking
the arm as well. No TICS are allowed in this lesson. Work this one several
times until you are confident the recruit can shoot well enough to take each
piece as he is supposed to. This is best done with the trainer and the cadet in
the same mech.
The mechs I
use are as follows:
1.) Whitworth 1s -
I like this mech for this game because the weapons are all medium ranges and
each one is located in the piece they are trying to remove.
2.) Spider 5v -
The most common mech used for this. Its weapons are smaller but located in the
CT so they aren't lost as you fight.
The end of this is up to the instructor
as to when he feels the cadet has sufficient aim, however I usually tell the
cadet he has to kill me to pass. This isn't true but does put an element of
challenge into it and an amount of excitement for the cadet if he manages to do
it.
Lesson
7: Introduction to Basic Team Lance
Concepts
Lances are groups of 2 or more
MechWarriors teamed up together to fight the enemy.
SSW rules
(Solaris Simm War rules):
· Assault Lance: This means take any ‘Mech you want in the game.
· Heavy Lance: This means take any Mech except an assault mech.
·
Medium Lance: This means no heavy or assaults, but take any
other Mech you want.
· Light Lance: This means take only lights.
· True Lance: Take one Mech of each class.
Lancing as a team requires practice,
patience, and skill, which comes with time. Each lance has a lance leader who
will call out the lance commands as needed in battle. It is recommended that,
in a drop, you press the “Delete” key once to set your radar scale to 800m to
avoid collisions. Also, 800m is just barely out of range for all long-range
weapons. (see Appendix VI: Weapons Quick Reference).
The lance leader may use as many lines
as necessary to type lance commands. It is important to know these
abbreviations without restricting the lance leader’s style and sense of timing
while conducting a lance. Each lance leader has his/her own style, which should
not be restricted by these commands, but rather enhanced by their
standardization. Idle chatter by lancemates is discouraged, but useful
information, such as the room temperature, location, and ‘Mech composition of
an enemy lance, can be entered by any player to help out.
The lance leader’s orders are always to
be followed. To coordinate lances in battle, lance leaders in House Davion use
the following standardized lance commands. These lance commands are to be typed
in lower case letters to save time and keystrokes. No ”Shift” key or “Caps
Lock” key is to be used.
Basic Lance Command abbreviations
Speed and Heading Commands
Upon first dropping into battle, the
location of the enemy lance and their ‘Mechs must be determined. After they have been located, the first
command to be issued will be the lance heading and the speed. ‘m’
H =
Heading (Use directional mark on the
compass tape at top of HUD on screen)
S = Speed (Shows in middle of screen with bar graph
display)
Mark = Mark (execute the speed and heading
command. Mark can be entered on the same line as a command, or later)
EXAMPLE: H 240 S 58 - Means to move toward heading 240 on the compass tape
at a speed of 58 kph.
Mark = Means to execute that command
Targeting Commands
Again, each lance leader has their own
style, and depending on battle conditions, flexibility is needed when selecting
a target. Three options are available.
Again, it’s important to know the commands, rather than restrict the lance
leader’s style.
·
T = Target (The mech that you are to select as your
first target).
·
Lead = Target lead
mech
·
T1, T2, T3, T4 = Target a
‘Mech which has been numbered from left to right by it’s field position
·
T (Mech name) – T jen, T
cat, t mad, etc.
·
(Target Area) – Target
designated area (H, RA, RT,CT,LT,LA,LL,RL)
Formation Commands
Formation are how your ‘Mechs are to
line up for combat. There is also a command available, @, that allows
experienced lances to form up on the move. To avoid confusion, ‘form’ is typed
before entering a formation name, rather than just “f”, so as not to be
confused with flanking. Graphics are shown below.
·
Form = Formation
(most assume there are 4 ‘Mechs in a drop)
·
LB = Line
abreast (all ‘Mechs line up across, or shoulder to shoulder)
·
Col = Column
(all ‘Mechs lined up behind the lead
‘Mech)
·
Y = Y formation
(outside 2 ‘Mechs are ahead of the 2 center ‘Mechs, which are behind one
another)
·
T = T formation.. (3 lined abreast with 1 in the
middle back)
·
B = Box
formation (a square, with 2 ‘Mechs in
front and 2 behind)
·
V = V
formation.. (2 outside ‘Mechs a little ahead of the middle 2)
·
W = Wedge
formation.. (2 middle mechs a little ahead of the outside 2)
EXAMPLES:
Form T Means form up in a T formation
Form __ @ s designates a speed for forming up on the
move, and is used with the form command
Form LB @ s58 means Line Abreast while rolling at 58 kph.
Maneuvering Commands
COC = Charge On
Contact (Go full speed charge to enemy
when in weapon range)
CO8 = Charge at
800 meters
C = Charge
now!!!
FOC = Fade On
Contact (Go into full reverse ASAP after weapon is in range)
FO8 = Fade at 800
meters
J = Jump (Use
jumpjets to help spread damage as you charge in.)
JO8 = Jump at 800
meters
FL = Flank left
FR = flank right
RIM = Play the
RIM (Stay in and out of range of the
enemy by moving forwards and backwards)
EAW = Engage At
Will (Tells all lancemates to just
attack anything when they can.. but try to keep together when doing so.)
EXAMPLES:
H
220 S 51 Form LB TLead - Heading 220
Speed 51Kph on mark, formation is Line Abreast, Target is Lead mech
FOC
Tmad RL - Fade On Contact, target the Marauder and take its right leg
H
95 S 45 Form=V Tcat - Heading 95 Speed
45Kph on mark, formation is V, and Target the Cat
COC
J - Charge on Contact and jump at contact
Lance Formation Graphics
1
LB
(Line Abreast) COL
(Column)
2 1 2 3 4
3
4
Y (Y formation) T (T
formation)
1 2 1 2 3 3 4 4
B (Box formation) W (Wedge
formation)
1 2 1 2
3 4 3 4
V (V formation)
2 1
3 4
Tracking Progress, Advancement, and Testing
The lessons in this manual have been developed
to standardize training for Mechwarriors in the AFFS. New soldiers to a unit will be provided this document. It is the responsibility of the new soldiers
Lance Leader to track and ensure all training is completed successfully. Units will develop means and procedures to
allow for the tracking an accomplishment of this training. Once training is completed a new soldiers is
permitted to join the unit in combat situations, not before. AFFS FM 110-1A is to be used by AFFS
mechwarriors as a quick reference guide for combat. Trainers and trainees will both use this document to accomplish
and monitor training. Trainees should
read the lesson before approaching a unit members to assist in training that
lesson. Units will develop their own
means to train and evaluate each lesson.
At no time will material be added to this curriculum with out the
permission of the Training Division, Department of Operations.
Appendix
I: What and Who is House Davion (Armed Forces of the Federated Suns, or AFFS)
The Soldiers Code for
House Davion
This Soldiers Code, as directed by the Prince, is established to govern
the actions of the men and women of the Armed Forces of the Federated
Suns. Our actions reflect directly on
our Commanders, our Comrades, and on House Davion. The Battletech 3025
"Rules of Conduct" (ROC) are the basis of this Code.
Article
1. I am a member of the Armed Forces of the
Federated Suns, and will act with dignity and discipline on and off the
battlefield. I will show the proper
military respect and courtesy due those appointed over me in the chain of
command, and to those serving under me. I will follow all legal directives and
orders. I will show the proper respect
to all members of the House, and will treat all players in the game with the
dignity and respect that they themselves would expect to receive, both on and
off the battlefield.
Article 2. I am a representative of House Davion.
Disagreements with other players are not to degenerate into personal attacks.
If I fall under attack, I will walk away from the incident and report it to my
immediate commanding officer. Taunting
of opposing players in the spirit of role-play is allowed. Personal attacks, insults, and harassment of
other players violate the Battletech 3025 ROC and the guidance defined here in
this code.
Article
3. I will conduct myself with dignity
representing the House with pride. If I fall under a personal attack by a House
Official I will walk away from the incident and ask the official to take the
incident up with my Commander or the House Morale Officer. I will then inform
my Commander via e-mail of the problem.
On the battlefield, honor among warriors is always expected. I will show
the enemy respect and courtesy. I will
be mindful of jokes and barbs, as what is fun and sport for me and my
companions may injure and insult a fellow warrior.
Violations of this code
will be dealt with at the lowest level in the Chain of Command as
possible. If intervention outside your
unit is necessary, you may contact the House Morale Officer (HMO) after all
members in your CoC have dealt with the infraction. Know that violations of
this code will be viewed violations of one’s oath to House and may be grounds
for corrective action and even dismissal from position as per the Davion Uniform Code of Military Justice
(DUCMJ).
Be true to yourselves and respect your
fellows. This is the Soldiers Code of House Davion.
BattleTech Rules of Conduct (BTROC)
The
BTROC is the overall behavioral code of MPBT:3025® established by Kesmai Corp.,
and applies to all players in the game regardless of their House affiliation.
The BTROC is the ruling laws of the game, and must never be violated.
Violations of the BTROC and the Terms of Service (TOS) will result in actioning
against the violator by Kesmai and it’s designated staff assistants, who are
members of ComStar. These penalties are described in the ‘Penalties’ section of
the BTORC. This file, roc.txt, is found in the MPBT:3025® folder on your hard
drive, and is duplicated here.[JLR2]
MultiPlayer
BattleTech: Solaris Rules of Conduct and Policies
Current
as of 11/11/98
Version
- ROCBT98h
The following represents the policies
under which players may participate in MultiPlayer BattleTech: Solaris. These polices are in addition to any rules
of conduct published by your service
provider. The service provider's
rules of conduct will be enforced at all times. Please read these policies and adhere to them. Violation of the rules can result in the
permanent lockout of your account from the game.
Offenses
Abusive
Behavior: MultiPlayer
BattleTech: Solaris is a social game, and much of the fun and excitement comes
from interaction among players. To a
certain extent, it is up to the players to decide what behavior is reasonable
and what is unreasonable within the game community. The players should use the ready room naming and password
features to screen people with different or unacceptable play styles whenever
possible.
However, bad language, scrolling,
harassment, personal threats, and other offensive behavior are not permitted.
"Backstabbing," the process by which one player intentionally fires
at a player on the same team, is typically considered "offensive
behavior" whether the target is destroyed or not. Offenders will be subject to the penalties
described below.
To report a player who is demonstrating
abusive behavior, click on the alert button ("!"), located in the
lower left-hand part of the screen in combat as well as in the rooms. The last several minutes of text you have
seen will be sent to MultiPlayer BattleTech: Solaris Product Support.
The "!" button, or TOS
notification is to be used as an alert to Kesmai that the Rules of Conduct have
been violated. Improper use of this notification system may
be subject to the penalties below.
Character
Names: Obscene or
offensive handles will not be tolerated.
Players with obscene or offensive character names will be subject to the
penalties described below.
The following character combinations,
and those which MultiPlayer BattleTech: Solaris staff members deem similar
enough, are reserved for official use only.
Any player observed using any of these combinations, or similar ones, in
such a way as might cause confusion to other players, is subject to the
penalties below.
Primus
Precentor
Adept
MPBT
MPBT Helper
ARIES
GameStorm
Kesmai
HL
The common handle for any staff member or House Leader that is
listed on the Announcement Message Boards.
In addition, GameStorm strongly
discourages players from deliberately impersonating another player. At the discretion of the observing staff
member, players impersonating another player are subject to the penalties
below.
Houses: House Leaders are both players and
official representatives of Kesmai in certain ways. House Leaders are picked by Kesmai and have certain
responsibilities both to the players belonging to that House and to Kesmai
until they resign. Replacements are approved by Kesmai's Product Support.
A player may not make the claim to be a
House Leader of any House unless officially appointed by MultiPlayer
BattleTech: Solaris' Product Support representative, employed by Kesmai
Corporation. Doing so is considered
impersonation and may subject the player to he penalties described below.
Similarly, claiming to represent or
belong to an element of a House's structure is potentially misleading to other
players. The House Leader has the right
to compose his or her entire chain of command, so any claims that are not
backed up by a House Leader are potentially false, intentionally or
unintentionally. If this happens as the
result of a deliberate action, players making such a claim may be
subject to the penalties below at the
discretion of the observing staff member.
Note that "stables," even
when affiliated with a House, do not represent an element of House structure
and are acceptable. This is the
recommended method of forming groups in MultiPlayer BattleTech: Solaris.
Stable
Names: All stables
that wish to carry names that have history in the FASA source books must seek
the approval of Kesmai Studios Product Support
Lead before using that name. Historical names will be permitted as long
as they follow the guidelines and references in those source books. All non-historical stables may seek to have
their names protected from use by other groups by following the guidelines laid
out by Kesmai Studios that are available in the files library. All recognized stable names that are already
in use will be prominently displayed on the "Announcements" message
board in the MPBT forum. Any reuse, or
infringement on an approved or authorized stable name will be considered
impersonation and will carry the penalties described below.
Bug
Abuse & Cheating: Bug abuse
disrupts the game and lessens the enjoyment of the game for everyone. Any effort to employ game bugs, circumvent
restrictions on game play, or otherwise use non-game features or other programs
to your advantage in MultiPlayer BattleTech: Solaris is not allowed; violators
will be subject to the penalties described below.
"Warping," or using any means
to alter the appearance or performance of a 'Mech in battle to either reduce
damage received or to increase the speed of the 'Mech is considered
cheating. Discussions on how to cheat
carry the same offense as cheating.
"Heads" and "Legs"
are considered a part of the mech and are a fair target. While some players may
consider these to be "off limits" or "dishonorable,"
targeting them is not considered cheating.
Booths in the bar are for use by all players. However, common courtesy should be
observed. The "ownership" of
the booth belongs to the player who occupied the booth first. Joining a booth against the will of the
current occupants will be considered Game Disruption and will be subject to the
subscribed penalties.
Ready rooms are for use by all players
and the only rules enforced there will be the MultiPlayer Battletech Rules of
Conduct. If a player wishes to use
additional rules by stating them in the room name, s/he may do so, but only at their
own risk. The game staff will not enforce player mandated rules such
as "Lites Only" or "Teams Only" or any other variations. In addition, GameStorm strongly encourages
players who wish to run specific types of rooms to use the password feature and
to only invite players who agree to the specified style of play.
The Solaris Starport is intended as a
tutorial for new players and will be staffed by MPBT Trainers during peak
hours. All recruiting should be done in
other areas of the game so as to not interfere with the trainers and to give
new players the opportunity to become fully acquainted with the game.
All bugs should be reported so that we
can fix them. If you observe someone
else abusing a serious bug, please report it to MultiPlayer BattleTech: Solaris
Product Support by using the "!" button.
Miscellaneous: Players discovered to be playing on an
account registered to a
fraudulent or incorrect name, address,
or billing method will be immediately locked out. MultiPlayer BattleTech: Solaris is not to be used as a venue for
the promotion of competing products or services. Individuals who actively promote competing products or services
within MultiPlayer BattleTech:Solaris will be subject to the penalties
described below.
GameStorm reserves the right to make
special-case adjustments to its policies and its actions concerning violation
of these policies.
Penalties
Anyone found to be in violation of the
rules of conduct described in this document, at the sole determination of
GameStorm, including any and all MultiPlayer BattleTech: Solaris staff members,
will be subject to the following:
1. First violation: The player will
receive a warning, either within the
game or via e-mail, describing his/her alleged breach of policy.
2. Second violation: The player will be
locked out of MultiPlayer BattleTech: Solaris for a period of up to one month,
and will be notified via e-mail.
3. Third violation: The player will be
locked out of MultiPlayer BattleTech: Solaris permanently. If the player has more than one account, all
accounts, on all services, will be simultaneously subject to the above actions.
In certain circumstances, such as
extremely abusive behavior, modifying the software, and so forth, a player will
be locked out without warning or notice of any kind at the discretion of the
acting staff member. However,
MultiPlayer BattleTech: Solaris Product Support will follow up with an e-mail
explaining why this step was taken.
BattleTech
Assistants
Game staff designated with [MPBT] in
their handles are empowered by Kesmai to warn or eject an offending player who
is violating these Rules of Conduct. These assistants may, from time to time,
make reasonable requests of the players that are not covered in this document. Such a request should always be carried out
with the understanding that questions about the instructions may be directed to
btsupport@kesmai.com. All appeals to
actions taken by the game staff may also be made to btsupport@kesmai.com.
Policies and
Disclaimers
MultiPlayer BattleTech: Solaris is
presented on an "as is" basis.
Usage of the MultiPlayer BattleTech: Solaris product indicates
acceptance of this, and any risk that may imply.
GameStorm is not obligated to credit a
player (with battles, ranking points, rank, etc.) if his/her usage is
interrupted by a software failure or other service interrupt. GameStorm's sole obligation is to make a
reasonable effort to fix a software problem or to return service as quickly as
possible (except in cases where the service interrupt is not related to the
MultiPlayer BattleTech: Solaris product itself).
Chat/Event Logging
It is standard operating procedure for
MultiPlayer BattleTech: Solaris to log all chat and significant events that
occur within the game. These files are
completely confidential except when violations of a service's terms of service
require they be delivered as proof of a charge in a disciplinary measure. These log files, and clips from them, are
not distributed to players except as proof of unacceptable behavior to the
player engaging in that behavior.
Game Mechanics
GameStorm reserves the right to issue
modifications to the game at any time, with or without notice. GameStorm will routinely add new features,
modify existing features, and alter additions or revisions that did not
function as expected.
These changes may affect your character
in a variety of ways.
If you feel that the change unfairly
penalizes your character, given the requirements of balance, challenge, and the
general good of the game, then you may make your views known to MultiPlayer
BattleTech: Solaris Product Support. It
should be understood, however, that GameStorm maintains a longer-range view
that may be in conflict with short-term and character-specific interests. GameStorm will always attempt to make the
best decision for the overall good of the game.
Transferring
Characters
Under no circumstances will GameStorm
transfer an existing character from one online service to another online
service. If you decide to switch online
services, you will have to create a new character for the new service. Even within the same service, characters
cannot be transferred from one account to another.
Character Purges
Inactive characters will be purged from
the database to make room for active characters. The rules are as follows:
If a player has never fought a battle,
either sanctioned or practice, the character is removed from our database after
thirty days of inactivity.
If a player has fought at least once,
but fewer than 250 battles, either sanctioned or practice, the character is
removed from our database after 45 days of inactivity.
If a player has fought more than 250
battles, either sanctioned or practice, the character is removed from our
database after 90 days of inactivity.
Any player ranked "Master" or
above on Solaris is exempt from these rules, but may be purged on a
discretionary basis due to extended inactivity, as deemed necessary by the
GameStorm staff.
GameStorm reserves the right to alter
this purge schedule based on usage within MultiPlayer BattleTech: Solaris, with
or without notice.
GameStorm reserves the right to remove
players from positions of authority in the game if they have been found to be
abusing said authority, or detracting from others' enjoyment of the game, as
determined by GameStorm and MultiPlayer BattleTech: Solaris staff.
House Davion Chain of Command
(CoC)
Prince or Princess (House Leader)
The House leader is the highest rank in
the chain of command.
Marshal of the Armies
The Marshal of
the Armies is the House Leader’s XO.
He/she is second in command of the House army.
Field Marshal
A Field Marshal commands a March made up of PDZs.
General
A General
commands a PDZ or can be an XO to a Field Marshal.
Marshal
A Marshal can be
a PDZ Commander or an XO to a PDZ Commander.
Leftenant General
Leftenant
Generals are Regiment Commanders or an XO to a PDZ Commander.
Colonel
Colonels command
Regiments.
Leftenant Colonel
Left. Colonels may be Regiment XOs or
Battalion Commanders.
Major
Commands a
Battalion.
Captain
Captains may be
Battalion Commanders, XOs, or a Company Commander.
Leftenant
Leftenants
command Companies, and can be a Company Commander’s XO.
Sergeant-Major
Sergeant-Majors can command Lances or be a Company Commander’s XO
Sergeant
Sergeants can be Lance Commanders or
aid to a Lance Commander.
Corporal
A Davion
Mechwarrior who has finished his training.
Private
A Davion MechWarrior in training
House Davion’s Place in the Inner Sphere
The Federated Suns is the largest
alliance of worlds in the Inner Sphere, comprising over 500 inhabited worlds.
Bound in a careful balance of local freedoms and centralized government, the
neo-feudal system of the Federated Suns serves to protect the citizenry while
taking leadership from the nobility, and ultimately the Prince. Despite the
best efforts of House Davion to raise the standard of living for its subjects,
there is a marked dichotomy of wealth, due to the uneven distribution of
resources. Some worlds are incredibly rich, while most are relatively
undeveloped in comparison.
Although it claims to hold tight to the
principles of democratic government and personal freedom, the exigencies of
centuries of war have made no less demands upon this state than any other. The
Davions rule their sprawling empire from New Avalon through a warrior
aristocracy, and at times the idealistic claims of the state propaganda machine
ring hollow, when military necessity rein in the luxuries of the common man.
Nonetheless, the rulers of the Federated Suns have as often sought to rule through
protection and the nurturing of individual concerns as through suppression. The
result is a fiercely dedicated citizenry that has for centuries withstood the
predications of the more totalitarian regimes of the nearby Capellan
Confederation and Draconis Combine.
New Avalon, the capital and
trend-setter of the Federated Suns, was settled originally by colonists of
Western European descent (primarily from Scotland, Ireland, England, Germany
and the Scandinavian countries), lending a strong monarchical tendency to House
Davion. After the upheavals of the collapse of the Terran Alliance and the rise
of the expansionist Terran Hegemony, the Crucis Pact that formed the Federated
Suns in 2317 drew together scores of worlds discontented with Terran rule.
Lucien Davion, Prime Minister of New Avalon at the forming of the FS, was
succeeded by his younger brother, and the Davion dynasty began.
The Age of War tested House Davion
sorely, and sowed the grudges that live on today in the near-ceaseless tensions
with its closest neighbors. Although relations with the Free Worlds League and
especially the Lyran Commonwealth are quite good, there seems little chance
that anything will come of this, given the lack of a common border for mutual
defense. The bitter and ongoing feud between Davion and House Kurita tends to
overshadow most peace overtures, and seldom are the borders between these two
giants quiet.
·
taken from the MultiPlayer BattleTech:3025® web page
Appendix II: History of the Inner Sphere from 2018 to 3025, and Time Line of Davion History
For reference:
Capellan
Confederation = House Liao (LCAF)
Draconis
Combine = House Kurita (DCMS)
Federated Suns
= House Davion (AFFS)
Free Worlds
League = House Marik (FWLM)
Lyran
Commonwealth = House Steiner (LCAF)
Events in
boldface apply specifically to House Davion
2018:
Kearny and Fuchida begin publishing theories
2026:
First working fusion drive developed
2086:
Terran Alliance formed
2107:
First hyperspatial jump made
2177:
Tikonov settled
2213: New
Avalon settled
2237: Grain
rebellion
2238:
Marik declares independence, Charles Marik forms Republic of Marik, Outer
Reaches Rebellion ends
2239: Covenant
of New Avalon ratified, Jason Hasek voted first Prime Minister of New Avalon
2241:
Marik Constitution passed at Constitutional Convention of Republic of Marik,
Oriente declares independence, Tomas Allison founds Federation of Oriente
2271:
Republic of Marik, Federation of Oriente, and Principality of Regulus sign
Document of Incorporation, forming Free Worlds League, Free Worlds League Rule
of 75 passed, Free Worlds League Treaty of Marik passed
2293:First New
Avalon-built freighter dedicated
2315: Terran
Hegemony formed, Duchy of Liao formed,
2317: Crucis
Pact signed, forming Federated Suns; Lucien Davion named first president of
Federated Suns
2319:
Department of Military Intelligence formed;
Draconis Combine founded
2332:Lucien
Davion retires, Charles Davion named president, Lucien Davion dies
2340:Charles
Davion dies, Reynard Davion named president
2341:
Lyran Commonwealth founded
2345:Acala
Pact signed
2346:Almach Accord signed
2366: Capellan Confederation founded
2371:Reynard
Davion dies, Etien Davion named president
2373:Board of Magistrates formed
2378:Etien Davion commits suicide, Paul Davion named president
2394:Paul Davion dies, Marie Davion named president
2398:Age of War begins
2399:Novaya Zemlya incident
2402:Marie Davion dies, Edmund Davion named president
2407:
Draconis Combine invasion of Tamar Pact, Tharkad named Lyran Commonwealth capital
2412:
Tintavel Massacre, Ares Conventions
adopted
2415:Edmund
Davion dies, Edward Davion named president
2416:
War between Lyran Commonwealth and Free Worlds League begins
2417:November
Conspiracy begins, Edward Davion assassinated, Simon
Davion named president; Principalities formed
2418:Simon Davion named first Prince of the Federated Suns
2420:
War between Lyran Commonwealth and Free Worlds League renewed, Free Worlds
League forces routed
2439:
Terran Hegemony invents BattleMech
2455:
Lyran Commonwealth gains BattleMech technology
2457:
Federated Suns gains BattleMech technology, Simon Davion dies,
James Davion named Prince
2459: First use of BattleMechs in combat
2461:
Draconis Combine gains BattleMech technology
2462:
Free Worlds League gains BattleMech technology
2467:James
Davion assassinated, Ellen Davion named Princess
2470:
First use of BattleMechs by Free Worlds League
2473:Act of
Succession passed
2475:
Free Worlds League Invasion of Terran Hegemony stalled by coup, First full-scale
BattleMech vs. BattleMech battle
2496:
First Dropship used
2502:Ellen
Davion retires, William Davion named Prince
2510:Ellen Davion dies
2512:William Davion dies, Alexander Davion named Prince; Cassandra
Varnay, David Varnay, Nikolai Rostov, Laura Davion, and Carmen Davion
named Regents
2518:Treason Trials begin
2520:Treason Trials end
2524:Davion Civil War begins
2537:Davion Civil War ends, Principalities disbanded
2558:
Lyran Commonwealth agrees to join the Star League
2567: New
Avalon Accords signed; Federated Suns agrees to join the Star League
2569:
Draconis Combine agrees to join the Star League
2571:
Star League Accords signed, Star League formed, Shandra Noruff-Cameron
appointed Commander-in-Chief of Star League Defense Force, Ian Cameron named
First Lord of the Star League
2578:
Star League officially declares war
2579:
Ian Cameron renounces tenets of Ares Conventions
2630:
First Hyperpulse Generator message transmitted
2738:
Aleksandr Kerensky named Commander-in-Chief of Star League Defense Force
2739:
Jerome Blake born on Terra
2751:
Richard Cameron named First Lord of the Star League, Aleksandr Kerensky named
Star League Regent
2766:
Stefan Amaris kills all known Camerons, seizes 95 Terran Hegemony worlds, and
gains control of 70% of Terran Hegemony Hyperpulse Generators
2767:
Amaris-Kerensky Civil War begins, Rim Worlds Republic invaded, Stefan Amaris
declares himself First Lord of the Star League
2769:
Rim Worlds Republic destroyed
2577:Reunification
War begins
2597:Reunification
War ends
2600:Alexander Davion dies, Zane Davion named Prince
2659:Zane Davion dies, Sarah Davion named Prince
2681:Sarah Davion dies, Samuel Davion named Princess
2696:Samuel Davion dies, Roger Davion named Prince
2703:Roger Davion dies, Joseph Davion named Prince
2728:War of Davion Succession begins
2729:War of Davion Succession ends, Joseph Davion dies in combat,
Richard Davion named Prince
2735:Preparedness Act passed
2745:Richard Davion dies, John Davion named Prince
2751:Simon Cameron dies
2760:Border War begins
2762:Border War ends, Executive Order 156 issued
2766:Amaris coup
2779:
Terra liberated, Jerome Blake returns to Terra, Stefan Amaris executed
2780:
Jerome Blake appointed Minister of Communications, Aleksandr Kerensky stripped
of title of Protector
2781: Star
League disbanded
2783:
Court of the Star League sealed
2784:Operation
Exodus takes place
2785:Towne Debacle
2786: First Succession War begins, Department of Communications changes
its name to ComStar, Draconis Combine Minoru Kurita proclaims himself First
Lord of the Star League
2787: War Zone
Actions become law; Kenyon Marik declares himself First Lord of the Star League
2796:Kentares
IV Massacre
2797:John Davion assassinated, Paul Davion named Prince
2798:Reformation begins; Ministry of Information, Intelligence,
and Operations formed
2801:Reformation ends
2821: First Succession War ends
2825:Thomas
Halder-Davion appointed Field Marshal
2829:Colonel Damien Hasek named Duke of New Syrtis
2830: Second Succession
War begins
2842:Paul
Davion dies
2843:Michael Davion named Prince
2846:Prime Marshal Peter Davion refuses to lead rebellion
2854:Marathon Offensive begins
2861:St. Ives Raid takes place
2864: Successor States meet in failed
peace talks, Second Succession War ends,
Draconis Combine Shadow War begins
2866: Third
Succession War begins; Operation Pendragon begins
2867:
Free Worlds League assassination attempt on Elizabeth Steiner fails
2870:Cutthroat
Fiasco
2873:Michael Davion dies, Carl Davion named Prince
2876:Carl Davion dies in combat, Melissa Davion named Princess,
Reformation of Federated Suns military takes place
2892:Melissa Davion dies, Joseph Davion II named Prince
2905:Armistice of Van Diemen IV signed
2931:Joseph Davion II abdicates, Peter Davion II named Prince
2935:Joseph Davion II dies
2952:Great Lee Turkey Shoot, Warrior's Cabal formed
2961:Peter Davion II assassinated, Andrew Davion named Prince
2988:
Capellan Confederation Death Commandos formed, ComStar First Circuit reorganized
to include Tharkad, Atreus, Sian, and New Avalon
2990:
Maximilian Liao named Chancellor of Capellan Confederation
2991:
Janos Marik named Captain-General of Free Worlds League
2999:Andrew
Davion dies, Ian Davion named Prince
3003:Michael Hasek marries Marie Davion-St. Claire
3004:
Takashi Kurita named Draconis Combine Coordinator.
3005:
Wolf's Dragoons appear in Federated Suns
3006:
Julian Tiepolo named Primus of ComStar
3007:
Alessandro Steiner is forced to retire, Katrina Steiner named Lyran
Commonwealth Archon
3010:
ComStar instigates Marik Civil War
3013: Ian
Davion dies; Hanse Davion named Federated Suns First Prince, Michael
Hasek-Davion named Federated Suns Duke of New Syrtis
3014:
Anton Marik begins Marik Civil War
3015: New Avalon
Institute of Science formed; Anton Marik kills Joshua Wolf and is
killed by Wolf's Dragoons
3020:
Capellan Confederation makes contact with Michael Hasek-Davion, Katrina Steiner
sends Peace Proposal to all Houses.
3022:
McCarron's War begins, Federated-Commonwealth Alliance Document signed
3025: Third
Succession War ends, McCarron's War ends
Appendix IV: Keyboard Layout
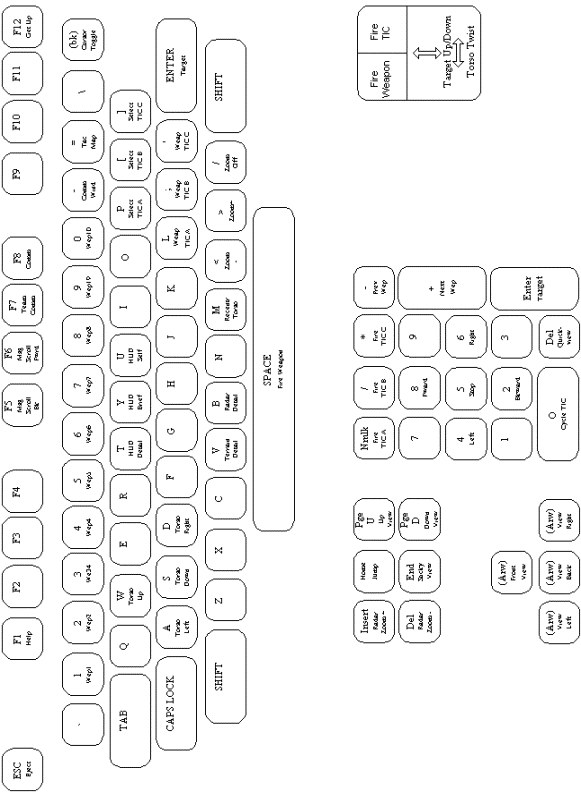
Appendix V: ‘Mech Quick Reference - Multiplayer BattleTech Mech Quick Reference
Light
‘Mechs
Tons Name Variant Speed
Armor Jump HS Weapons
|
20 |
Flea |
FLE-4 |
64/97 |
2.3 |
0 |
0 |
10 |
LLaser,
2xSLaser, Flamer |
|
20 |
|
FLE-15 |
64/97 |
3.3 |
0 |
0 |
10 |
2xMLaser,
2xSLaser, 2xMG(200/200), Flamer |
|
20 |
Hornet |
HNT-151 |
54/86 |
4.5 |
150 |
5 |
10 |
LRM-5(24),
MLaser, SLaser |
|
20 |
Locust |
LCT-1V |
86129 |
4.5 |
0 |
0 |
10 |
MLaser,
2xMG(200/200) |
|
20 |
|
LCT-1S |
86/129 |
3.4 |
0 |
0 |
10 |
2xSRM-2(50/50),
MLaser |
|
20 |
|
LCT-1M |
86/129 |
1.1 |
0 |
0 |
10 |
2xLRM-5(24/24),
MLaser |
|
20 |
|
LCT-1E |
86/129 |
4.5 |
0 |
0 |
10 |
2xMLaser,
2xSLaser |
|
20 |
|
LCT-1L |
86/129 |
4.5 |
0 |
0 |
10 |
MLaser,
2xMG(200/200) |
|
20 |
Stinger |
STG-3G |
64/97 |
4.6 |
180 |
6 |
10 |
2xMLaser |
|
20 |
|
STG-3R |
64/97 |
3.3 |
180 |
6 |
10 |
MLaser,
2xMG(200/200) |
|
20 |
Wasp |
WSP-1A |
64/97 |
3.3 |
180 |
6 |
10 |
MLaser,
SRM-2(50) |
|
20 |
|
WSP-1D |
64/97 |
3.3 |
180 |
6 |
10 |
MLaser,
2xSLaser, Flamer |
|
20 |
|
WSP-1K |
64/97 |
3.8 |
180 |
6 |
10 |
MLaser,
MG(200) |
|
20 |
|
WSP-1L |
64/97 |
3.3 |
180 |
6 |
10 |
SRM-4(25) |
|
20 |
|
WSP-1S |
64/97 |
3.3 |
180 |
6 |
10 |
MLaser,
SRM-2(50) |
|
20 |
|
WSP-1W |
64/97 |
3.3 |
180 |
6 |
10 |
6xSLaser |
|
25 |
Commando |
COM-2D |
64/97 |
4.4 |
0 |
0 |
10 |
SRM-6(15),
SRM-4(25), MLaser |
|
25 |
|
COM-3A |
64/97 |
3.3 |
0 |
0 |
10 |
2xSRM-6(15/15),
MLaser, Flamer |
|
30 |
Falcon |
FLC-4N |
64/97 |
6.6 |
180 |
6 |
12 |
MLaser,
2xSLaser, 2xMG(200/200) |
|
30 |
Firefly |
FFL-4A |
54/86 |
7.0 |
120 |
4 |
10 |
LRM-5(24),
3xMLaser, 4xSLaser |
|
30 |
Javelin |
JVN-10F |
64/97 |
6.4 |
180 |
6 |
12 |
4xMLaser |
|
30 |
|
JVN-10N |
64/97 |
4.4 |
180 |
6 |
10 |
2xSRM-6(30/30) |
|
30 |
Spider |
SDR-5D |
86/129 |
3.9 |
240 |
8 |
10 |
MLaser,
2xFlamer |
|
30 |
|
SDR-5K |
86/129 |
3.9 |
240 |
8 |
10 |
MLaser,
2xMG(200/200) |
|
30 |
|
SDR-5V |
86/129 |
3.9 |
240 |
8 |
10 |
2xMLaser |
|
30 |
Urbanmech |
UM-R60 |
21/32 |
6.6 |
60 |
2 |
11 |
AC-10(10),
SLaser |
|
30 |
|
UM-R60L |
21/32 |
4.4 |
60 |
2 |
11 |
AC-20(5),
SLaser |
|
30 |
Valkyrie |
VLK-QA |
54/86 |
6.5 |
150 |
5 |
11 |
LRM-10(12),
MLaser |
|
30 |
|
VLK-QD |
54/86 |
6.5 |
150 |
5 |
11 |
LRM-10(12),
MLaser |
|
35 |
Firestarter |
FS9-H |
64/97 |
5.8 |
180 |
6 |
10 |
2xMLaser,
2xMG(200/200),4xFlamer |
|
35 |
|
FS9-M |
64/97 |
8.0 |
180 |
6 |
11 |
2xMLaser,
2xSLaser, 2xMG(200/200) |
|
35 |
Jenner |
JR7-D |
75/118 |
4.5 |
150 |
5 |
10 |
SRM-4(25),
4xMLaser |
|
35 |
|
JR7-F |
75/118 |
7.4 |
150 |
5 |
10 |
4xMLaser |
|
35 |
Ostscout |
OTT-7J |
86/129 |
4.9 |
240 |
8 |
10 |
MLaser |
|
35 |
Panther |
PNT-9R |
43/64 |
7.1 |
120 |
4 |
13 |
PPC,
SRM-4(25) |
|
35 |
Raven |
RVN-1X |
54/86 |
4.4 |
0 |
0 |
12 |
SRM-6(15),
2xMLaser |
|
35 |
Wolfhound |
WLF-1 |
64/97 |
8.0 |
0 |
0 |
10 |
LLaser,
4xMLaser |
Medium
‘Mechs
Tons Name Variant Speed
Armor Jump HS Weapons
|
40 |
Assassin |
ASN-101 |
75/118 |
4.4 |
150 |
5 |
10 |
LRM-5(24),
MLaser, SRM-2(50), 3x SLaser |
|
40 |
|
ASN-21 |
75/118 |
5.0 |
210 |
7 |
10 |
LRM-5(24),
SRM-2(50), MLaser |
|
40 |
Cicada |
CDA-2A |
86/129 |
4.6 |
0 |
0 |
10 |
2xMLaser,
SLaser |
|
40 |
Hermes
II |
HER-2M |
64/97 |
8.1 |
0 |
0 |
12 |
3xMLaser,
2xMG(200/200), Flamer |
|
40 |
|
HER-2S |
64/97 |
8.1 |
0 |
0 |
10 |
AC-5(20),
MLaser, Flamer |
|
40 |
Vulcan |
VL-2T |
64/97 |
5.5 |
180 |
6 |
10 |
AC-2(45),
MLaser, MG(200), Flamer |
|
40 |
|
VL-5T |
64/97 |
7.6 |
180 |
6 |
12 |
4xMLaser,
MG(200), Flamer |
|
40 |
Whitworth |
WHT-1 |
43/64 |
8.6 |
120 |
4 |
10 |
2xLRM-10(24/24),
3xMLaser |
|
40 |
|
WHT-1S |
43/64 |
8.6 |
120 |
4 |
14 |
2xSRM-6(30/30),
3xMLaser |
|
45 |
BlackJack |
BJ-1 |
43/64 |
9.1 |
120 |
4 |
11 |
2xAC-2(45/45),
4xMLaser |
|
45 |
|
BJ-1DB |
43/64 |
8.1 |
120 |
4 |
17 |
2xLLaser,
2xMLaser |
|
45 |
|
BJ-1DC |
43/64 |
9.1 |
0 |
0 |
12 |
2xAC-2(45/45),
4xMLaser, 2xSLaser |
|
45 |
Hatchetman |
HCT-3F |
43/64 |
6.9 |
120 |
4 |
14 |
AC-10(20),
2xMLaser |
|
45 |
|
HCT-NH |
43/64 |
6.9 |
120 |
4 |
14 |
AC-10(20),
2xMLaser |
|
45 |
Phoenix
Hawk |
PHX-1 |
64/97 |
8.4 |
180 |
6 |
10 |
LLaser,
2xMLaser, 2xMG(200/200) |
|
45 |
|
PXH-1D |
64/97 |
8.4 |
180 |
6 |
12 |
LLaser,
2xMLaser |
|
45 |
|
PXH-1K |
64/97 |
10.0 |
0 |
0 |
13 |
LLaser,
2xMLaser, SLaser |
|
45 |
Vindicator |
VND-1AA |
54/86 |
4.9 |
150 |
5 |
16 |
LRM-5(24),
PPC, MLaser, SLaser |
|
45 |
|
VND-1R |
43/64 |
9.6 |
120 |
4 |
16 |
LRM-5(24),
PPC, MLaser |
|
50 |
Centurion |
CN9-A |
64/97 |
8.8 |
0 |
0 |
10 |
LRM-10(12),
AC-10(10), 2xMLaser |
|
50 |
|
CN9-AH |
43/64 |
9.1 |
0 |
0 |
10 |
LRM-10(24),
AC/20(10) |
|
50 |
|
CN9-AL |
64/97 |
11.1 |
0 |
0 |
16 |
LRM-10(24),
LLaser, 2xMLaser, SLaser |
|
50 |
Enforcer |
ENF-4R |
43/64 |
9.6 |
120 |
4 |
12 |
AC-10(10),
LLaser |
|
50 |
Hunchback |
HBK-4G |
43/64 |
10.6 |
0 |
0 |
13 |
AC-20(10),
2xMLaser, SLaser |
|
50 |
|
HBK-4H |
43/64 |
10.6 |
0 |
0 |
13 |
AC-10(20),
4xMLaser, SLaser |
|
50 |
|
HBK-4J |
43/64 |
10.6 |
0 |
0 |
14 |
2xLRM-10(24/24),
5xMLaser, SLaser |
|
50 |
|
HBK-4N |
43/64 |
10.6 |
0 |
0 |
13 |
2xLRM-5(24/24),
AC-5(20), 4xMLaser, SLaser |
|
50 |
|
HBK-4P |
43/64 |
10.6 |
0 |
0 |
23 |
8xMLaser,
SLaser |
|
50 |
|
HBK-4SP |
43/64 |
10.6 |
0 |
0 |
19 |
2xSRM-6(30/30),
4xMLaser, SLaser |
|
50 |
Trebuchet |
TBT-5J |
54/86 |
8.6 |
150 |
5 |
15 |
LRM-15(8),
3xMLaser |
|
50 |
|
TBT-5N |
54/86 |
8.1 |
0 |
0 |
10 |
2xLRM-15(16/16),
3xMLaser |
|
50 |
|
TBT-5S |
54/86 |
8.1 |
0 |
0 |
18 |
2xSRM-6(30/30),
3xMLaser |
|
55 |
Dervish |
DV-6M |
54/86 |
8.0 |
150 |
5 |
10 |
2xLRM-10(24/24),
2xMLaser, 2xSRM-2(100/100) |
|
55 |
Griffin |
GRF-1DS |
54/86 |
10.1 |
150 |
5 |
16 |
LRM-5(24),
LLaser, 2xMLaser |
|
55 |
|
GRF-1N |
54/86 |
10.1 |
150 |
5 |
12 |
LRM-10(24),
PPC |
|
55 |
|
GRF-1S |
54/86 |
10.1 |
150 |
5 |
16 |
LRM-5(24),
LLaser, 2xMLaser |
|
55 |
Hoplite |
HOP-4C |
43/64 |
12.1 |
0 |
0 |
16 |
LRM-5(24),
AC-10(10) |
|
55 |
Shadow
Hawk |
SHD-2D |
54/86 |
4.9 |
90 |
3 |
14 |
LRM-5(24),
AC-5(20), 2xSRM-2(100/100), 2xMLaser |
|
55 |
|
SHD-2D2 |
54/86 |
4.9 |
90 |
3 |
14 |
LRM-5(24),
AC-5(20), 2xSRM-2(100/100), 2xMLaser |
|
55 |
|
SHD-2H |
54/86 |
10.1 |
90 |
3 |
12 |
LRM-5(24),
AC-5(20), MLaser, SRM-2(50) |
|
55 |
|
SHD-2K |
54/86 |
10.1 |
90 |
3 |
17 |
LRM-5(24),
PPC |
|
55 |
Wolverine |
WVR-6K |
54/86 |
12.1 |
0 |
0 |
14 |
LLaser,
2xMLaser, SRM-6(30), SLaser |
|
55 |
|
WVR-6M |
54/86 |
11.1 |
150 |
5 |
14 |
LLaser,
2xMLaser, SRM-6(15) |
|
55 |
|
WVR-6R |
5486 |
10.0 |
150 |
5 |
12 |
AC-5(20),
SRM-6(15), MLaser |
Heavy
‘Mechs
Tons Name Variant Speed
Armor Jump HS Weapons
|
60 |
Dragon |
DRG-1C |
54/86 |
13.1 |
0 |
0 |
10 |
AC-2(45),
LRM-10(24), 2xMLaser |
|
60 |
|
DRG-1N |
54/86 |
10.6 |
0 |
0 |
10 |
LRM-10(24),
AC-5(40), 2xMLaser |
|
60 |
Ostroc |
OSR-2C |
54/86 |
9.5 |
0 |
0 |
15 |
2xLLaser,
SRM-4(25), 2xMLaser |
|
60 |
|
OSR-2D |
54/86 |
9.5 |
0 |
0 |
15 |
2xLLaser,
2xMLaser, SRM-4(25) |
|
60 |
|
OSR-2L |
54/86 |
9.5 |
0 |
0 |
15 |
LRM-5(24),
2xLLaser, 2xMLaser |
|
60 |
|
OSR-2M |
54/86 |
9.5 |
150 |
5 |
15 |
2xLLaser |
|
60 |
Ostsol |
OTL-4D |
54/86 |
9.5 |
0 |
0 |
16 |
2xLLaser,
4xMLaser |
|
60 |
|
OTL-4F |
54/86 |
9.5 |
0 |
0 |
16 |
2xPPC |
|
60 |
Quickdraw |
QKD-4G |
54/86 |
8.6 |
150 |
5 |
13 |
LRM-10(12),
SRM-4(25), 4xMLaser |
|
60 |
|
QKD-4H |
54/86 |
8.6 |
150 |
5 |
13 |
LRM-10(12),
SRM-4(25), 4xMLaser |
|
60 |
Rifleman |
RFL-3C |
43/64 |
9.1 |
0 |
0 |
10 |
2xAC-10(20/20),
2xMLaser |
|
60 |
|
RFL-3N |
43/64 |
7.9 |
0 |
0 |
10 |
2xAC-5(20/20),
2xLLaser, 2xMLaser |
|
60 |
|
RFL-4D |
43/64 |
7.9 |
0 |
0 |
15 |
2xPPC,
2xLLaser |
|
65 |
Catapult |
CLPT-C1 |
43/64 |
10.6 |
120 |
4 |
15 |
2xLRM-15(16/16),
4xMLaser |
|
65 |
|
CLPT-K2 |
43/64 |
11.6 |
0 |
0 |
20 |
2xPPC,
2xMLaser, 2xMG(200/200) |
|
65 |
|
CLPT-C4 |
43/64 |
10.6 |
120 |
4 |
10 |
2xLRM-20(24/24),
2xSLaser |
|
65 |
Crusader |
CRD-3D |
43/64 |
12.6 |
0 |
0 |
14 |
2xLRM-15(16/16),
2xSRM-4(25/25), 2xMLaser |
|
65 |
|
CRD-3K |
43/64 |
12.6 |
0 |
0 |
10 |
2xLRM-10(24/24),
2xSRM-6(15/15), 2xMLaser |
|
65 |
|
CRD-3L |
43/64 |
12.6 |
120 |
4 |
12 |
2xLRM-10(24/24),
2xSRM-4(25/25), 2xMLaser, 2xMG(200/200) |
|
65 |
|
CRD-3R |
43/64 |
12.6 |
0 |
0 |
10 |
2xLRM-15(16/16),
2xSRM-6(15/15), 2xMLaser, 2xMG(200/200) |
|
65 |
|
CRD-4D |
43/64 |
12.6 |
0 |
0 |
14 |
2xLRM-15(16/16),
2xSRM-4(25/25), 2xMLaser |
|
65 |
|
CRD-4K |
43/64 |
12.6 |
0 |
0 |
14 |
2xLRM-15(16/16),
2xSRM-4(25/25), 2xMLaser |
|
65 |
JagerMech |
JM6-A |
43/64 |
8.6 |
0 |
0 |
10 |
2xAC-2(45/45),
2xLRM-15(16/16), 2xMLaser |
|
65 |
|
JM6-S |
43/64 |
6.6 |
0 |
0 |
10 |
2xAC-2(45/45),
2xAC-5(40/40), 2xMLaser |
|
65 |
Thunderbolt |
TDR-5S |
43/64 |
13.6 |
0 |
0 |
15 |
LRM-15(16),
LLaser, 3xMLaser, SRM-2(50), 2xMG(200/200) |
|
65 |
|
TDR-5SE |
43/64 |
13.6 |
120 |
4 |
17 |
LRM-10(24),
LLaser, 3xMLaser |
|
65 |
|
TDR-5SS |
43/64 |
13.6 |
0 |
0 |
21 |
PPC,
SRM-6(15), 3xMLaser, Flamer |
|
70 |
Archer |
ARC-2K |
43/64 |
11.7 |
0 |
0 |
12 |
2xLRM-15(32/32),
2xLLaser |
|
70 |
|
ARC-2R |
43/64 |
13.6 |
0 |
0 |
10 |
2xLRM-20(24/24),
4xMLaser |
|
70 |
|
ARC-2S |
43/64 |
13.6 |
0 |
0 |
10 |
2xLRM-15(32/32),
2xSRM-4(50/50), 4xMLaser |
|
70 |
|
ARC-2W |
43/64 |
10.6 |
0 |
0 |
10 |
2xLRM-20(24/24),
2xSRM-4(25/25), 2xMLaser |
|
70 |
Grasshopper |
GHR-5H |
43/64 |
13.6 |
120 |
|
22 |
LRM-5(24),
LLaser, 4xMLaser |
|
70 |
Warhammer |
WHM-6D |
43/64 |
14.1 |
0 |
0 |
20 |
2xPPC,
2xMLaser, 2xSLaser |
|
70 |
|
WHM-6K |
43/64 |
10.6 |
0 |
0 |
20 |
2xPPC,
SRM-6(15), 2xMLaser, 2xSLaser |
|
70 |
|
WHM-6L |
43/64 |
10.6 |
0 |
0 |
18 |
2xPPC,
SRM-6(15), 2xMLaser, 2xSLaser, 2xFlamer |
|
70 |
|
WHM-6R |
43/64 |
10.6 |
0 |
0 |
18 |
2xPPC,
SRM-6(15), 2xMLaser, 2xSLaser, 2xMG(200/200) |
|
75 |
Marauder |
MAD-3D |
43/64 |
12.1 |
0 |
0 |
20 |
2xPPC,
LLaser, 2xMLaser |
|
75 |
|
MAD-3L |
43/64 |
12.1 |
0 |
0 |
18 |
PPC,
AC-5(20), LLaser, 2xMLaser |
|
75 |
|
MAD-3M |
43/64 |
12.1 |
0 |
0 |
20 |
2xLLaser,
AC-5(20), 2xMLaser |
|
75 |
|
MAD-3R |
43/64 |
12.1 |
0 |
0 |
16 |
2xPPC,
AC-5(20), 2xMLaser |
|
75 |
Orion |
ON1-K |
43/64 |
14.3 |
0 |
0 |
10 |
LRM-15(16),
AC-10(20), SRM-4(25), 2xMLaser |
|
75 |
|
ON1-V |
43/64 |
12.1 |
0 |
0 |
10 |
LRM-15(16),
AC-10(20), 2xMLaser, 2xSRM-4(50/50) |
|
75 |
|
ON1-VA |
43/64 |
14.6 |
0 |
0 |
16 |
AC-10(20),
2xMLaser, 2xSRM-4(50/50) |
|
|
|
|
|
|
|
|
|
|
Assault
‘Mechs
Tons Name Variant Speed
Armor Jump HS Weapons
|
80 |
Awesome |
AWS-8Q |
32/54 |
15.6 |
0 |
0 |
28 |
3xPPC,
SLaser |
|
80 |
|
AWS-8R |
32/54 |
15.7 |
0 |
0 |
28 |
2xLRM-15(16/16),
LLaser, SLaser |
|
80 |
|
AWS-8T |
32/54 |
15.7 |
0 |
0 |
23 |
2xLRM-15(16/16),
2xLLaser, SLaser |
|
80 |
|
AWS-8V |
32/54 |
15.7 |
0 |
0 |
28 |
LRM-15(16),
PPC, LLaser, SLaser |
|
80 |
Charger |
CGR-1A1 |
54/86 |
10.6 |
0 |
0 |
10 |
5xSLaser |
|
80 |
|
CGR-1L |
54/86 |
6.0 |
0 |
0 |
10 |
LLaser,
2xMLaser |
|
80 |
Victor |
VTR-9A |
43/64 |
9.1 |
120 |
4 |
15 |
AC-20(15),
SRM-4(25), 2xMLaser, MG(200), 2xFlamer |
|
80 |
|
VTR-9A1 |
43/64 |
10.6 |
120 |
4 |
15 |
AC-20(15),
2xMLaser, SRM-4(25), 2xMG(200/200) |
|
80 |
|
VTR-9B |
43/64 |
12.1 |
120 |
4 |
15 |
AC-20(15),
SRM-4(25), 2xMLaser |
|
80 |
|
VTR-9D |
43/64 |
9.1 |
120 |
4 |
15 |
AC-20(15),
2xMLaser, SRM-4(25), MG(200), 2xFlamer |
|
80 |
|
VTR-9S |
43/64 |
11.0 |
120 |
4 |
15 |
AC-20(15),
2xMLaser, SRM-6(15) |
|
80 |
Zeus |
ZEU-6S |
43/64 |
12.1 |
0 |
0 |
17 |
LRM-15(8),
AC-5(20), LLaser, 2xMLaser |
|
80 |
|
ZEU-6T |
43/64 |
12.1 |
0 |
0 |
19 |
LRM-15(8),
PPC, LLaser, 2xMLaser |
|
85 |
BattleMaster |
BLR-1D |
43/64 |
16.1 |
0 |
0 |
24 |
PPC,
4xMLaser, 2xMG(200/200) |
|
85 |
|
BLR-1G |
43/64 |
15.1 |
0 |
0 |
18 |
PPC,
6xMLaser, SRM-6(30), 2xMG(200/200) |
|
85 |
Shogun |
SHG-2E |
32/54 |
16.1 |
90 |
3 |
17 |
2xLRM-15(16/16),
PPC, 2xSRM-6(30/30) |
|
85 |
Stalker |
STK-3F |
32/54 |
14.1 |
0 |
0 |
20 |
2xLRM-15(48/48),
2xLLaser, 2xSRM-6(30/30), 4xMLaser |
|
85 |
|
STK-3H |
32/54 |
14.1 |
0 |
0 |
20 |
2xLRM-20(12/12),
4xMLaser, 2xSRM-6(30/30) |
|
85 |
|
STK-4N |
32/54 |
14.1 |
0 |
0 |
22 |
LRM-10(12),
2xLLaser, 2xMLaser, 2xSRM-6(30/30) |
|
85 |
|
STK-4P |
32/54 |
14.1 |
0 |
0 |
20 |
LRM-10(12),
2xLLaser, 2xSRM-6(30/30) |
|
90 |
Cyclops |
CP10-HQ |
43/64 |
10.6 |
0 |
0 |
12 |
LRM-10(24),
2xMLaser, SRM-4(25) |
|
90 |
|
CP10-Q |
43/64 |
17.6 |
0 |
0 |
14 |
2xLRM-10(48/48),
3xMLaser, SRM-4(25) |
|
90 |
|
CP10-Z |
43/64 |
10.6 |
0 |
0 |
12 |
LRM-10(12),
AC-20(20), SRM-4(25), 2xMLaser |
|
95 |
Banshee |
BNC-3E |
43/64 |
15.6 |
0 |
0 |
16 |
PPC,
AC-5(20), SLaser |
|
95 |
|
BNC-3M |
43/64 |
15.6 |
0 |
0 |
16 |
2xPPC,
2xMLaser |
|
95 |
|
BNC-3Q |
43/64 |
15.6 |
0 |
0 |
12 |
AC-20(20),
SLaser |
|
95 |
|
BNC-3S |
36/54 |
15.6 |
0 |
0 |
21 |
2xPPC,
AC-10(20), SRM-6(15), 4xMLaser, 2xSLaser |
|
100 |
Annihilator |
ANH-1A |
21/32 |
13.1 |
0 |
0 |
18 |
4xAC-10(40/40/40/40),
4xMLaser |
|
100 |
Atlas |
AS7-S |
36/54 |
19.6 |
0 |
0 |
20 |
LRM-20(12),
AC-20(10), SRM-6(15), 4xMLaser |
|
100 |
Imp |
IMP-2E |
32/54 |
18.5 |
0 |
0 |
30 |
LRM-15(8),
2xPPC, 5xMLaser |
|
100 |
Marauder
II |
MAD-4A |
32/54 |
19.6 |
90 |
3 |
29 |
2xPPC,
LLaser, 2xMLaser |
Appendix VI: Weapons Quick
Reference - MultiPlayer BattleTech Weapon Quick Reference
NAME Damage
Dly Heat Eff.Range Class Tons Ammo
Ballistic Weapons
Autocannon/2 Light 2.5 1 120-720 L 6 45
Autocannon/5 Medium 5.0
1 90-540 L 8
20
Autocannon/10 Heavy 5.0
3 450 L 12
10
Autocannon/20 Brutal 7.5 7 270 M 14 5
Machine Gun Light 2.5 0 90 S 0.5 200
Energy
Weapons
Flamer Light 5.0 3 90 S 1
Laser(Large) Heavy 7.5
8 450 L 5
Laser(Medium) Medium 5.0
3 270 M 1
Laser(Small) Light 5.0 1 90 S 0.5
PPC Heavy 10.0 10 90-540 L 7 ---
Missile Weapons *
LRM-5 Light 7.5 2 270-630 L 2 24
LRM-10 Medium 7.5
4 270-630 L 5 12
LRM-15 Heavy 7.5
5 270-630 L 7
8
LRM-20 Brutal 7.5 6 270-630 L 10
6
SRM-2 Light 5.0 2 0-270 M 1 50
SRM-4 Medium 5.0
3 0-270 M 2 25
SRM-6 Heavy 5.0
4 0-270 M 3 15
(* Weapons do
a variable amount of damage scattered across a target.)
---------------------------------------------------------------
NAME: The
common name for the weapon.
DAMAGE: The
amount of damage the weapon does on a scale from light to brutal.
DLY: Time
in seconds a weapon takes to recharge after it has been fired.
HEAT: The
number of heat points a weapon generates when fired.
EFFECTIVE RANGE (in meters):
MIN.: The minimum range in meters a weapon can be
safely fired. Shorter distances to the target may result in the firing mech suffer
backblast damage.
MAX.: The maximum
range in meters at which the weapon is effective.
CLASS: The
range class of the weapon.
Short-Range (S) weapons have a range up to 90 meters
Medium-Range (M) weapons range up to 270 meters
Long-Range (L) weapons range up to 720 meters.
TONS: Weight
of the weapon, or how much of a’Mech's total tonnage is used by the weapon.
AMM: Number
of rounds of ammunition. If a weapon
has a number in this column, it means it is dependent on a limited ammunition
supply.
Appendix VII: ‘Mech Weak spots
There are many different ways to
destroy the different kinds of mechs. Each mech has its own distinct weak
spots, just as they all have their own strengths. Here, we will examine the
different weak spots for the most common mechs.
It is important to remember to check
all mechs statistics. While choosing your mech, click the EXAMINE button and
look to see where the weapons are, so that you can properly pilot your mech to
minimize the enemies access to your weapons. When you drop, examine your
targeted opponent’s weapons and their location with the “T” (the U button to
see your weapons) and the status of those weapons will be displayed as well.
Knowing these abbreviations will be
vital to your understanding the mechs you choose and fight. Front Cent Torso
(FCT) is one of the most common and important abbreviations in regards to mech
characteristics. The FCT is always the spot on the mech where its
"neck" runs down the "breastbone" of the mech all the way
to the "groin". These areas are clear to see on all mechs except for
those with the Jenner, Catapult, and Stalker type chassis. Those mechs do not
resemble humanoid shapes at all, but all have their own clearly defined kill
spots, and with all those chassis types, that kill spot is as vaguely
consistent as it is with the humanoid form mechs. The Right and Left Center
Torso (RCT and LCT), although it states the torso, it is closer to being more
in the area of a shoulder (these places will be displayed in graphic detail
below). They are also referred to as the Right and Left Torso (RT and LT).
Lastly, there is the RA and LA Right and Left Arms (RA and :A), and the CT
Center Torso. Some mechs mount weapons on the CT, but we wont really refer to
them here, if your shooting the CT (same as FCT) then you’re not going for
weapons....YOU’RE GOING FOR THE KILL.
This section will describe what you
want to hit, where and for what reason. Yet, ALL the facts her can be used in an
equally important facet as well. If you are going to take one of the mechs
below, you will know what part of your mech you want to protect, and what your
opponent will go for. Below it will talk about the Griffins
weakness with all its weapons being on the right arm. If YOU are the one taking
the Griffin, then you may want to try twisting your torso in the opposite
direction, and learning to keep that right arm turned away from the enemy when
your not firing weapons to protect it. Everything below can be used to bolster
your offensive and defensive performance.
|
|
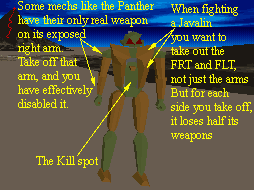
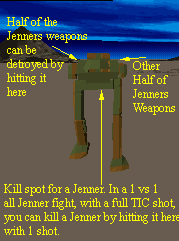 Jenners are one of the
most commonly used in lite class, and for good reason. They are very fast, have
JumpJets, and have a fine array of weapons. As you will see in the figure, they
have definate weak spots. They are not thinly armored for a lite, but nor are
they heavily armored. In the lite class if you prefer armor over speed, with a
very small disadvantage in weapons (you lose 1 SRM..the only difference) then
take the JAVELIN. Versus a JAV, there are several tactics
endorsed depending on what class you have. The important thing to keep in mind
is unless you have a much larger class, it has sufficient FCT armor to take a
FCT shot. The best considered tactic to employ VS a JAV is to take away each
half of its weapons first, then go for the kill. Also in the light class you
will see mechs like the Panther and Valkyrie
employed. As stated as soon as you drop you should be viewing your opponents
weapons, and the weapons placement on the mech. You will not that the Panther
has a formidble PPC as its main weapon, but it is placed on the Right Arm,
quite an exposed area. So versus a Panther you may want to attemptto take the
right arm off first and fast, effectively disabling the enemy. Keep in mind
that opposed to the Javalin, the Panthers PPC is on the arm itself, not the the
shoulder, or side of the torso. As you view various mech statistics more and
more often, you will remember which mechs have what weapons and where they are
located. You should also learn which mechs have weak FCT armor, such as Wasps
and Spiders. For these mechs, as with manyothers the best tactic is to go
straight for the kill. Remember a mech with half its weapons can still kill you,
mechs with NO weapons can even ram you and if the pilot is quite good can even
kill you, but dead mechs cant touch you at all.
Jenners are one of the
most commonly used in lite class, and for good reason. They are very fast, have
JumpJets, and have a fine array of weapons. As you will see in the figure, they
have definate weak spots. They are not thinly armored for a lite, but nor are
they heavily armored. In the lite class if you prefer armor over speed, with a
very small disadvantage in weapons (you lose 1 SRM..the only difference) then
take the JAVELIN. Versus a JAV, there are several tactics
endorsed depending on what class you have. The important thing to keep in mind
is unless you have a much larger class, it has sufficient FCT armor to take a
FCT shot. The best considered tactic to employ VS a JAV is to take away each
half of its weapons first, then go for the kill. Also in the light class you
will see mechs like the Panther and Valkyrie
employed. As stated as soon as you drop you should be viewing your opponents
weapons, and the weapons placement on the mech. You will not that the Panther
has a formidble PPC as its main weapon, but it is placed on the Right Arm,
quite an exposed area. So versus a Panther you may want to attemptto take the
right arm off first and fast, effectively disabling the enemy. Keep in mind
that opposed to the Javalin, the Panthers PPC is on the arm itself, not the the
shoulder, or side of the torso. As you view various mech statistics more and
more often, you will remember which mechs have what weapons and where they are
located. You should also learn which mechs have weak FCT armor, such as Wasps
and Spiders. For these mechs, as with manyothers the best tactic is to go
straight for the kill. Remember a mech with half its weapons can still kill you,
mechs with NO weapons can even ram you and if the pilot is quite good can even
kill you, but dead mechs cant touch you at all.
 In the Medium
class there may be the greatest variety of mechs in all the classes. The
Assasin and Cicada can both be as easily placed in
the Lite class as the Medium. But they are med and for a reason. They have more
armor considering their high speed. The Wolverine 6M may be
considered the best all around Medium class mech, becuase of its strong weapons
and its formidable FCT armor. The best way to take out a Wolv is to keep going
right for its FCT. The Griffin is also considered one of the best of all meds. It
has potent weapons, and fair speed. With JumpJet capatbility and reasonable FCT
armor. Its main weakness is that all its weapons are exposed on the right arm.
Many will go for the right arm immedaitly. Be advised though that many Griffin
pilots are as aware of this weakness as you are. Another option is going right
for its FCT. The armor there is not a strong that of say a Wolv, and it can be
killed outright fairly easily.
In the Medium
class there may be the greatest variety of mechs in all the classes. The
Assasin and Cicada can both be as easily placed in
the Lite class as the Medium. But they are med and for a reason. They have more
armor considering their high speed. The Wolverine 6M may be
considered the best all around Medium class mech, becuase of its strong weapons
and its formidable FCT armor. The best way to take out a Wolv is to keep going
right for its FCT. The Griffin is also considered one of the best of all meds. It
has potent weapons, and fair speed. With JumpJet capatbility and reasonable FCT
armor. Its main weakness is that all its weapons are exposed on the right arm.
Many will go for the right arm immedaitly. Be advised though that many Griffin
pilots are as aware of this weakness as you are. Another option is going right
for its FCT. The armor there is not a strong that of say a Wolv, and it can be
killed outright fairly easily.
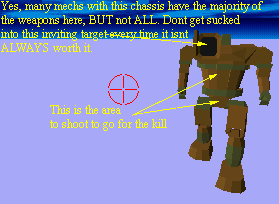 There are
currently 5 varieties of Hunchbacks, all with similar but
distinct characteristics. The obvious reason for the name is the clear hunch on
its right side. Some variants of Hunchbacks do in fact house the majority of
the weapons there. But some have the weapons spread evenly to both sides. The
FCT armor on Hunchs is considerable, so disabling it is a strong option. Even
if the weapons are spread to both sides, the arms and front Right and Left
Center Torsos (FRT and FLT) both come off fairly easily. If the weapons are
lopsided to one side, then it makes the disabling of the mech all that much easier.
There are
currently 5 varieties of Hunchbacks, all with similar but
distinct characteristics. The obvious reason for the name is the clear hunch on
its right side. Some variants of Hunchbacks do in fact house the majority of
the weapons there. But some have the weapons spread evenly to both sides. The
FCT armor on Hunchs is considerable, so disabling it is a strong option. Even
if the weapons are spread to both sides, the arms and front Right and Left
Center Torsos (FRT and FLT) both come off fairly easily. If the weapons are
lopsided to one side, then it makes the disabling of the mech all that much easier.
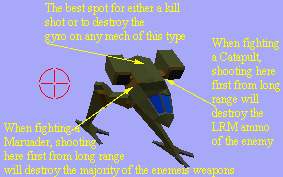 In the Heavy
Class, the most widely used mech is the CATAPULT C1, as well
as the MARAUDER both the 3D and 3R varients. These mechs are not the
standard humanoid form.Their FCT is not apparent, but they do have weakness
just as all mechs do. With both mechs the best tactic to employ is the flyover
shot to the hood. This allows access to the engine and gyro that cannot be
gotten from the front until the FLT and FRT are gone. In the figure to the left
the FRT and FLT are not designated, but they are considered to be the elongated
sides on either sides of the cockpit (the 2 blue windows are the cockpit) The
FLT and FRT slope from the very point of these mechs all the way to where they meet
the ammunition boxes, the squares on the back/top of the mech on either side.
Destroying the ammo box only disables that one weapon (either an LRM for a CAT,
or a PPC for a MAD) As opposed to shooting these obvious targets, long range
shots should be made on the FLT when your enemy is a CAT and the FRT when
facing a MAD. The reason for this is that for a MAD, by taking out the FRT, you
will disable 1 of the 2 PPCs as well as either an AC5 or a Large Laser. as well
as one M Laser. As described above, if you hit the right spot on the FLT of a
CAT, you will take out ALL the LRM ammo, thats for both LRM`s, so this is a
good spot to practrice, because in 1
on 1 CAT fights, this is where you want to place your long range LRM15 shots.
If you are using a Lite mech versus either of these mechs, the best tactic to
attempt is to come at an angle from the right side (its right side as you
approach it from the front) with your Jav or Jenner twisted to full right. As you
come from the right, you will want to go to the left at an angle across its
front, and just as you get in range, goto full forward flight. As you go across
the front, take your full alpha TIC shot in the spot described in the image
above. Taking your shot coming from an angle does 2 things. First it makes you
harder to hit as opposed to comig straight on, but
In the Heavy
Class, the most widely used mech is the CATAPULT C1, as well
as the MARAUDER both the 3D and 3R varients. These mechs are not the
standard humanoid form.Their FCT is not apparent, but they do have weakness
just as all mechs do. With both mechs the best tactic to employ is the flyover
shot to the hood. This allows access to the engine and gyro that cannot be
gotten from the front until the FLT and FRT are gone. In the figure to the left
the FRT and FLT are not designated, but they are considered to be the elongated
sides on either sides of the cockpit (the 2 blue windows are the cockpit) The
FLT and FRT slope from the very point of these mechs all the way to where they meet
the ammunition boxes, the squares on the back/top of the mech on either side.
Destroying the ammo box only disables that one weapon (either an LRM for a CAT,
or a PPC for a MAD) As opposed to shooting these obvious targets, long range
shots should be made on the FLT when your enemy is a CAT and the FRT when
facing a MAD. The reason for this is that for a MAD, by taking out the FRT, you
will disable 1 of the 2 PPCs as well as either an AC5 or a Large Laser. as well
as one M Laser. As described above, if you hit the right spot on the FLT of a
CAT, you will take out ALL the LRM ammo, thats for both LRM`s, so this is a
good spot to practrice, because in 1
on 1 CAT fights, this is where you want to place your long range LRM15 shots.
If you are using a Lite mech versus either of these mechs, the best tactic to
attempt is to come at an angle from the right side (its right side as you
approach it from the front) with your Jav or Jenner twisted to full right. As you
come from the right, you will want to go to the left at an angle across its
front, and just as you get in range, goto full forward flight. As you go across
the front, take your full alpha TIC shot in the spot described in the image
above. Taking your shot coming from an angle does 2 things. First it makes you
harder to hit as opposed to comig straight on, but 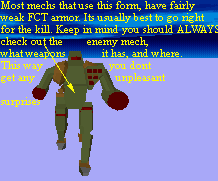 secondly it
increases your chance of either a 1 shot kill (this CAN be done with a Jenner
VS a CAT or MAD) or more likely a Gyro kill, where the enemy is badly disbaled
and cannot get up. It can still fire, but is mortally wounded, all that is left
is a quick circle behind it with a shot to the back of its head, now made easy
as it lays on the ground. The most common form of Heavy mech is more humanoid
in appearence. With the vast majority of these the best shot to take is that at
the FCT. Most of these mechs have fairly weak FCT armor, but also their weapons
are spread enough so that trying to go after weapons alone is disadvantageous. The humanoid body style in the heavy class
is best represented by the Jagermech. The CT in these ‘Mechs is generally very
weak.
secondly it
increases your chance of either a 1 shot kill (this CAN be done with a Jenner
VS a CAT or MAD) or more likely a Gyro kill, where the enemy is badly disbaled
and cannot get up. It can still fire, but is mortally wounded, all that is left
is a quick circle behind it with a shot to the back of its head, now made easy
as it lays on the ground. The most common form of Heavy mech is more humanoid
in appearence. With the vast majority of these the best shot to take is that at
the FCT. Most of these mechs have fairly weak FCT armor, but also their weapons
are spread enough so that trying to go after weapons alone is disadvantageous. The humanoid body style in the heavy class
is best represented by the Jagermech. The CT in these ‘Mechs is generally very
weak.
 In the Assault
class, there are 3 forms of mechs, 2 are humanoid in appearence, and one is more
similar to the CAT and MAD, but in a much larger version. The Stalker
and new Marauder II both have easily found killspots. again,
it is tempting to go for weapons pods or FLT and FRT. In nearly the same amount
of time it takes to diable either one of the sides weapons, you can nearly
destroy the mech with the same amount of well placed shots. As you can see in
the figure as with most mechs of this type, the difficulty is in not hitting
the legs of the enemy, but dont let that discourage you. With practice you will
find that hitting that spot between the legs becomes easier, and regardless is
alwasy the mroe worthwhile target. For some, when fighting an these mech types
in another assualt, that killspot is not as visable in close quarters battle.As
analternative, the next best place for weapons fire are the FRT and FLT. By
destroying those quarterpanels as opposed to shooting the weapons boxs just
behind them, you will not
In the Assault
class, there are 3 forms of mechs, 2 are humanoid in appearence, and one is more
similar to the CAT and MAD, but in a much larger version. The Stalker
and new Marauder II both have easily found killspots. again,
it is tempting to go for weapons pods or FLT and FRT. In nearly the same amount
of time it takes to diable either one of the sides weapons, you can nearly
destroy the mech with the same amount of well placed shots. As you can see in
the figure as with most mechs of this type, the difficulty is in not hitting
the legs of the enemy, but dont let that discourage you. With practice you will
find that hitting that spot between the legs becomes easier, and regardless is
alwasy the mroe worthwhile target. For some, when fighting an these mech types
in another assualt, that killspot is not as visable in close quarters battle.As
analternative, the next best place for weapons fire are the FRT and FLT. By
destroying those quarterpanels as opposed to shooting the weapons boxs just
behind them, you will not
|
|
only detroy those boxes in the rear as
well, but will also gain access to the center of the mech, which when hit is
just like hitting the more preferred killspot. Once a side has been opened up,
it is better to continue to hit that same spot, and attempt to destroy the mech
as opposed to trying to destroy the other side.
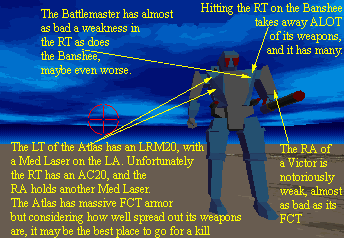 Taking on an Atlas
may not be as impossible as it used to be, but it is still one of the most
formidable of all mechs. With weapons spread fairly evenly on both sides, it is
hard to pick one over the other, with an LRM20 & SRM on the LT (Short Range
Missile on the Left Torso), and Med Laser on the Left Arm (LA) against the AC20
on the RT, Med Laser on the RA...it is hard to know which side to go for. One
of the best tactics may be to just pound away on its massive 2.94 FCT. In
contrast the Banshee has a weakness with its RT. Ojnce that is
taken off, and the arm that goes with it, the Banshee has much fewer weapons.
In addition it has weaker FCT armor. The Banshee is feared becuase of its vast
weapons array, but once the RT is gone, then it is not in good shape at all. Victors
all have nearly the same 2 weaknesses, most (including the best one-the 9AI)
have its main weapon on its RA. Also they have notoriously weak FCT armor. The Battlemaster
has its only PPC on its RA, and 3 of its 6 Med lasers on the RT, so going right
for that RT and taking it off as the arm comes off with it, leave the mech with
only 3 Med Lasers and some amusing Machine Guns, which although many do enjoy
the sound, dont really seem to do much damage.
Taking on an Atlas
may not be as impossible as it used to be, but it is still one of the most
formidable of all mechs. With weapons spread fairly evenly on both sides, it is
hard to pick one over the other, with an LRM20 & SRM on the LT (Short Range
Missile on the Left Torso), and Med Laser on the Left Arm (LA) against the AC20
on the RT, Med Laser on the RA...it is hard to know which side to go for. One
of the best tactics may be to just pound away on its massive 2.94 FCT. In
contrast the Banshee has a weakness with its RT. Ojnce that is
taken off, and the arm that goes with it, the Banshee has much fewer weapons.
In addition it has weaker FCT armor. The Banshee is feared becuase of its vast
weapons array, but once the RT is gone, then it is not in good shape at all. Victors
all have nearly the same 2 weaknesses, most (including the best one-the 9AI)
have its main weapon on its RA. Also they have notoriously weak FCT armor. The Battlemaster
has its only PPC on its RA, and 3 of its 6 Med lasers on the RT, so going right
for that RT and taking it off as the arm comes off with it, leave the mech with
only 3 Med Lasers and some amusing Machine Guns, which although many do enjoy
the sound, dont really seem to do much damage.